
Hello Everyone!!
I'm Manu and I'm so glad to be a part of the amazingly talented team here at Peek-A-Boo Designs!!!
Firstly, wishing you all a very Happy New Year, may this year brings in lots of good luck and happiness in your life!
I'm happy to join this team and Peek-A-Boo has some very promising stamp sets coming out in the future!!! This area is something to look forward to in the future!! I'm also glad to be associated with an amazing talent team of Peek-A-Boo Designers and I'm sure it will be a fun ride with them!
There is a lovely challenge this month, it's all about a gorgeous mood board for you to pick colors from and yes, you can make anything!
Checkout the details here
You all must have checked the January 2016 Release, if not, do hop over to the Peek-A-Boo Designs site and checkout the amazing launch! This post is my inspiration from the Launch collection. I will be doing an inspiration for the challenge seperately!
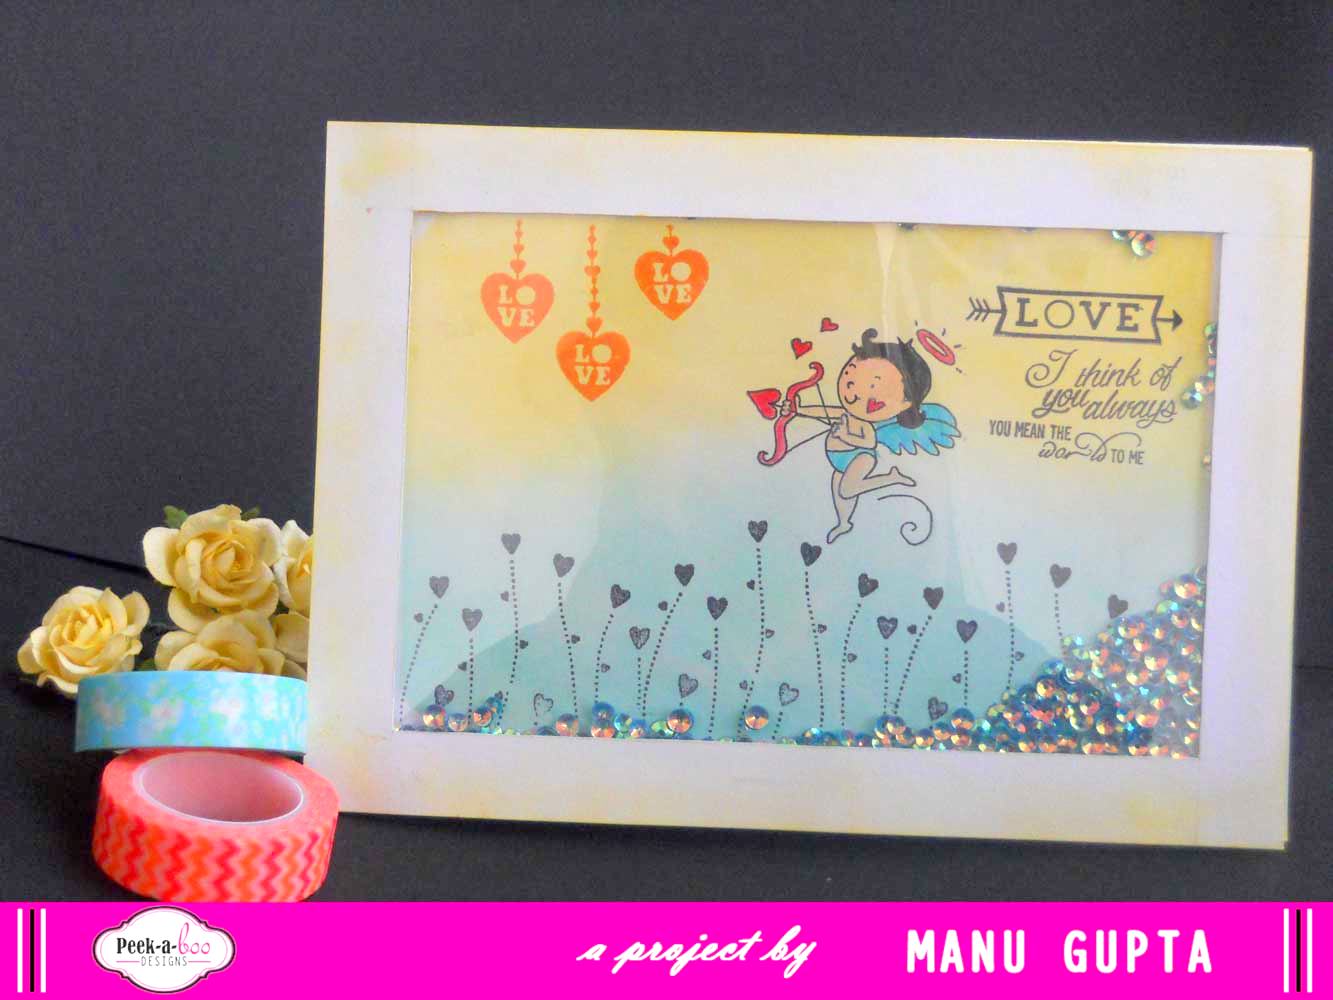
Here are my cards with the newly launched Valentine's Collection. Since Valentine's is just around the corner, stamps related to valentine's were a must!
I loved the doodled heart shape in 'You and Me' collection and making a card with this stamp was a must. The other stamp set I totally loved was the 'Valentine Love' and I loved making a scene with the same. And yes, this one had to be a shaker card!!!

I have a pictorial tutorial on how I made these cards, So you can sit back and enjoy the tutorial on how I made this shaker card

Take an A5 sheet of cardstock (I took a Fabriano, you can take any cardstock as long as it is sturdy). and I measured abuout .75 from each sides and then cutted the middle portion with a cutter.

Then take a A4 cardstock and convert it into an A5 card. Then happened the distress inks on the card. Do note that I have kept the panel on the card and used masking tape to ensure that it doesn't slips off (this step is really not very much needed, since anyhow the panel will overlap the base of the card.
Then I had stamped a few heart shaped stamp from the 'Valentine Love' stamp set multiple times. I also stamped the cute little cupid and coloured it using the Faber Castel color pencils.

And now comes the fun part, on how to make the shaker panel. take the panel and adhere a OHP sheet, the size of the shaker panel. Once done, adhere a double sided foam tape to add dimension. (I did this one the coloured portion of my panel ,so that the back side, which is white comes on the front.)

Now, once my sentiment is stamped, Add some sequins (or any small beads, just about anything as long as it's not quite big)

Now, take off the seal from the double sided tape and carefully add the panel on top of your card. Be sure to keep the card flat while doing so, so that the sequins doesn't falls off the card.
And TA-DA... your shaker card is ready!!!
Isn't it fun making one??? I totally loved this one, though I feel I could have added a little more of those distress ink colors in there!
Here are a few more shots of this lovely shaker card!

My second card was done by stamping the doodled heart from the 'YOU and ME' stamp set multiple time, I had just randomly stamped them and then coloured each heart with the Faber Castel watercolor pencils.

This took a good two hours but then the end result was fabulous!!

Once done, I mounted it on a A5 card base in black color and voila.. I had another vibrant card !

Do play along our second challenge which is based on a gorgeous Mood Board and yes, it's anything goes. Check all the details here.
I hope you did like my creations and do take time out to gimme some reviews!!
I would love to hear what you have to say about these two pretties!!!
Happy Crafting!
Manu
Shaker+ Valentine, cuteness!!! Love both of your beautiful creations Manu!
ReplyDeleteThank you for liking the cards Vinita!! Do participate in the challenge!
DeleteWow!! Both the cards are stunning!!! I loved them both equally! :)
ReplyDeleteSuchi xx
Lovely creations and awesome tutorial ! totally love it !!
ReplyDeleteBeautiful cards Manu & the images are all sooo cutesy & u've done a great job with the coloring :) luvvv them both.!
ReplyDeleteLovely cards... :-)
ReplyDeleteLovely cards... :-)
ReplyDeleteOh yes definitely worth the 2 hours you spent on it Manu!!
ReplyDeleteCheers
Dr Sonia
Loved the colourful doodled hearts....xoxo
ReplyDeleteBeautiful cards..Loved the shaker one specially..its damn cute !!
ReplyDeleteLovely Cards .. Loved the Doodle Heart card a lot !!
ReplyDeleteThats really pretty !! U took the stamp set to the nect level.
ReplyDeleteLovely cards.. Thanks for inspiring n tempting me to buy that stamp set ;)
ReplyDeleteLovely cards.. Thanks for inspiring n tempting me to buy that stamp set ;)
ReplyDeleteLovely cards! & awesome tutorial! Thanks for sharing :)
ReplyDelete