Showing posts with label Halak. Show all posts

Wednesday, June 15, 2016

Welcome To Our New Design Team - 2016 !!

Good Morning crafty friends!
Today we are so pleased to announce a new Design Team for July - December 2016 and also a farewell to those that are moving on.

Peek-a-boo Designs has had some remarkable & talented designers on our team and we are thrilled to be able to continue in this tradition with these new team members aswell.

What an amazing design team call we just finished. Peek-a-boo Designs received applications from so many talented designers all over the world! Thank you to each and every one of you that took the time to submit your work, it is truly appreciated.

We are happy to announce the new Design Team that will finish off 2016 with us are:
Daksha Popat (India)


Halak Shah (India)


Juhi Khanna (Singapore)


Martha Lucia Gomez (Florida)


Swapna Patil (India)


Congratulations to all of you ladies! We are looking forward to all of your creativity. 

We would also like to sincerely THANK YOU to those DT members who are  finishing up their term with Peek-a-boo Designs in June and we wish them well with their future crafty adventures.  

Manu Gupta
Piyanki Biswas 
Sharada Dilip Acharya

Please stay tuned for our Design Team Introduction coming soon.
Happy Crafting !! 

Tuesday, June 14, 2016

Stencil Frenzy !!

Hi every one !! 
This month we released an small array of stencils which is a great add to our line !! 

Our Dts have taken the opportunity to make a stencil intensive project !! 


Here are the projects that they made !! 


Halak beautifully   used all three stencils from the collection and made this gorgeous project !! She used them to ink up her project and can you see the crispness the inking has with sharp edged !! This stencil is fantastic for ink blending !!


Our DT Piyanki Biswas made these ultra elegant gift tags. She had firstly distressed the background and used a darker colour of the same to stencil. These matching set of tags are so pretty and quick to make !!


This uber mixed media project with this grundge tiles cum wall background is so pretty .. The textures created using tbe tecture paste is to die for .. The use of flowers and sentiment enhance the background !!


 Wooow .. Bubbles looks so fantastic !! The dept of the tecture paste can be easily seen in this project !! Which enhances the entire project three folds !! 


The last mixed media project for the post has some really pretty textures with loads of spraying and texture paste !! The backgrounds stand out so nicely !! 

Supplies used :


Hope you enjoyed our take by the DTs .. Hoping to see some awesome work by our  fellow crafters using Peek-a-boo Designs stencils .. 

Loves and hugs 
Vidushi 

Wednesday, June 1, 2016

Challenge #7 and a Blog Hop

Hey crafty heads !!

We had an amazing time last month trying and finalizing all the new release items. You can buy the new release items from our webpage www.thepeekaboodesigns.com.

Without any further delay let me talk about the Challenge this month.


The basic theme is ANYTHING GOES and there is a little twist to the same.You need to use an item from your OLD STASH and mix it with something you added RECENTLY PURCHASED. Yep we generally ignore our old supplies and on creating stuffs from the new ones. So here is the time open your old supplies .. remove that small amount of dust from them .. and create some awesome project combining them with new ones.

 General Rules : 
  1. Be a follower of our blog
  2. Create a new project for the challenge. No back links please. Altered art, ATCs, cards, scrapbook pages, or any other craft projects are acceptable as long as they adhere to the month’s challenge. You may enter as many projects as you like.
  3. USING STAMP/STENCIL IS A MUST
  4. Please link to the exact post on your blog - not the home page URL of your blog - using the inlinkz icon at the bottom of the challenge.
  5. You MUST mention our blog in your post AND link back to our blog or your entry will not be counted.
  6. If you do not have a blog you can enter our challenges by tagging us on facebook and instagram with "#PABDchallenges". If you do not tag us we do not see your entry.
  7. You may enter a card, a page layout, an altered item, a mixed media item, a mini album.. anything that fits the challenge, unless the challenge states that a specific type of project must be created. Please , no 100% digital projects. A part of the project can be digital.
  8. No restriction on the number of challenges you can take part in - As long as your project matches our challenge, you may "pile on" the other challenges to your heart's content.
  9. We will accept a maximum of three entries per person. Please add -2 and -3 next to your name for subsequent entries.
  10. A Winner will be chosen on their merits. So submit your most creative projects. And that's all there is to it! International Crafters are welcome to participate in our challenges but their prizes would only be sent to an Indian address due to high shipping cost
To add some fun to the challenge and bidding a goodbye to the existing team we have a blog hop.. Hmm yeah I know we dint even realize the time flew by so quickly and a span of 6 months passed away with a blink of an eye.

To view all the inspirational post visit their personal blogs which are listed below.


The Mega Prize is a Rs.1000  gift voucher  to choose what you like at the Peek-a-boo Designs online store.

Here are the details of the Blog Hop:
  • Five winners will be chosen at RANDOM from any of the design team blogs and they would get the gorgeous creations made by our DT and some goodies that they would add along.
  • Leave a comment on the design team blogs listed below and the Peek-a-boo Designs blog for your chance to win!
  • Be sure to be a follower of all the Blogs (5 DT Blogs and 1 Peek-a-boo Design Blog)
  • Deadline: You have until midnight IST on Thursday, 30th June to leave a comment. 
  • Tell us that you Facebooked about our blog hop by tagging us and using ---> #PABDbloghop
  • Tell us that you shared it with your Instagram friends by tagging us (@peekaboo_designs)  and using ---> #PABDbloghop
  • Tell us that you posted on your blog about our blog hop by linking your blog hop post to the assigned inlink.


Peek-a-boo Designs Blog  <----- You are here

Friday, May 20, 2016

How to create texture with stamps


Good afternoon dear friends! ^__^
I'm Halak and today we're going to be talking about creating texture with stamps.

Ever feel that sometimes you wanna create a project but don't have stuff matching to the theme you want to go with?

No problem! You can do all that you want and more with just stamps and inks.

List of the items used in this project : 


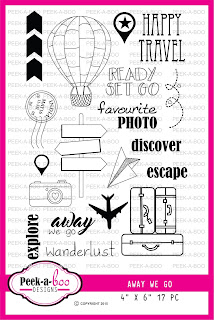
2. 1 Month Exclusive Stamp Club (Limited Edition Stamp Set - Away We Go)


3. PABD Black Cardstock

Sit back and relax as I take you through a step-by-step picture tutorial on how to make the project that you see in the first image above.
      

It starts with the background. Nope, no fancy pattern papers et al, this project uses 3 distress inks (Salty Ocean, Mowed Lawn & Peacock Feathers) along with 1 Archival Ink (black).

I smooshed Salty Ocean + Mowed lawn onto an acetate sheet, added a little water and put my cardstock over it.
Removed cardstock from acetate sheet, left it to dry for some time and this is the background I got.

Tip : Don't forget about co-ordinating colors! You can use a multitude of color combinations if you know which colors co-ordinate with each other. I used blue and green, but you can also use : Orange and Pink, Pink and Yellow, Green and Yellow etc.!


Time for stamping!
First, I stamped the circular design from the Roundy Sentiments stamp set.
After that I added sentiment and that little plane from Limited Edition Away We Go stamp set. (It's a fantastic set and seriously guys, if you are not subscribing for the limited edition sets, you are missing out BIG TIME!)


After this, I added some more elements from the Away We Go stamp set with distress inks. (Salty Ocean, Mowed Lawn & Peacock Feathers.)

Tip : Use second generation stamping while stamping with distress inks as the distress inks are juicy and if you directly ink and stamp, it could lead to a very dark and uneven image.


Then, I distressed the edges, added another sentiment + image from Away We Go stamp set and matted it onto PABD Black Cardstock.

Tip : You don't need any fancy tools to distress the paper. Just use the cutter blade. Slowly move it across the paper till you don't achieve the desired results. It's a very quick and effective way to add texture but don't forget to be careful while using it.


Matted it onto PABD White Card Base and did some more stamping around the edges.

Tip : Stamping on the edge adds interest to project, maintains continuity and makes it look like one cohesive piece. It's a great way to create that added texture without the use of additional materials like modeling paste, stencils etc.


Lastly, added a couple of blue sequins and a tiny blue confetti star in the location stamp at the top.

Also added black glitter to the plane.

Here's a close up :


And there you have it folks, a project that has color and texture without the use of added materials and 3D objects! Very mail-friendly too!

I hope you enjoyed reading and learnt something new, thank you so much for stopping by! *Hugs*

Friday, March 25, 2016

Peek-a-tute with Nysaa!

Hello and good afternoon! ^__^
I'm Halak and today I'm going to be taking you through a tutorial for the card you see in the image above.
Before I begin, a reminder : Our current ongoing challenge is to have a colorful project in a set, that is two or more things in a project but it cannot be two cards.
This tutorial has been created keeping in mind the ongoing challenge guidelines.
This means, your entry to the challenge can be a card with a matching tag, a card and a matching envelope, an album and a tag... etc.
Two or more projects in a set which have to have 4 or more colors from a rainbow. There's still time to play along so I hope you participate! ^__^
Okay so now that the reminder is done with, let's get to the project!
I made this card with a matching envelope using the following stamp sets : 
2.  Nysaa 

Steps :
First, I stamped Nysaa onto white cardstock twice. Kept one image as-is and fussy cut the second image.
Then on the cardstock where I kept Nysaa as-is, I placed a sentiment from Stringy Text to position and stamp.
Note : I masked the lower portion below Nysaa's dress using a small piece of scrap paper. I was not actually bothered about the dress itself because I had decided early on that I would be paper piecing.
Once my sentiment was stamped, I took the fussy-cut Nysaa and masked the Nysaa on the cardstock with masking tape.
After I masked Nysaa, I took a stencil and stenciled pattern using Orange (Spiced Marmalade) and Yellow (Mustard Seed) distress inks.
Tip : When you stencil, exert the lightest pressure you can and then build up on color. Remember, transition from light to dark with building up on colors is easy, but a transition from dark to light is not possible in stenciling.
For the dress I stamped Nysaa partially onto pattern paper.
Note : A great way to add a personalized touch to pattern paper is to stencil a design on top of it like I did using distress inks.
It gives projects added dimension and depth.

Tip : It is also helpful if you know what color blends will give what results, example : 
Pink + Yellow = Orange 
Blue + Yellow = Green
Pink + Blue = Purple etc. 
It is easily available online with a chart so when you have the time, do look it up, it will benefit you greatly because you will be able to achieve more from less.

Positioned the dress that I paper-pieced onto Nysaa and decided on the embellishments I was going to use.
Tip : If you are a lazy colorist like me (lol) or coloring is not your thing but you want a beautiful outcome while using a doll image, an option like Nysaa is great because once the dress is paper-pieced, there is very little coloring required!
Once the dress was adhered, I colored Nysaa using color pencils (Staedtler Luna, 48 color set).
Finally added some pearls + rhinestones, matted the white cardstock onto purple cardstock and added a tiny black felt flourish on the top left hand side.
So that's how I did it!
The matching envelope was super simple, just stenciled the same design that was on card background using yellow and orange distress inks, stamped the Happy Birthday sentiment from Stringy Text and added a couple of embellishments.
Hope you enjoyed the project and learnt something new!
Thank you for stopping by! *Hugs*

Monday, March 14, 2016

Damask delights - Project ideas

Hello! ^__^

Having Monday blues? Well I hope this post brightens your day and cheers you up because today I have project ideas! Yeah, something for everybody!

I'm Halak and today's post features the super pretty and versatile Damask stamp set which is a part of March 2016 stamp release by Peek-a-boo Designs (PABD).

Before we get on with projects, here's the complete list of stamps and card stock that I used :

Stamps :
1. Damask 
2. Lily Hope and,
3. Bold You 

Cardstock :
1. Black (For ATC base)
2. White Sand Texture (For Card base)

This card that you see above is Project #1.

I love the fact that the damask set has solid images, (I am a very lazy colorist) and it takes ink really well.
You must have seen the stunning post by our DT member Vijaylaxmi, wherein she made a beautiful pattern paper using the damask set.
If you haven't seen it, click -- Here

Now I'm going to go through a few other fun ways to use this set.

In this project, I wanted a mixed damask look because... come on..
asymmetrical is sometimes super fun!

So I stamped a mixed bunch of damask designs in pale pink dye ink, added a sentiment from Lily Hope set and some butterfly punch-outs + sequins.

You can see the close-up of the mix damask designs in pale pink ink here :

Crisp and gorgeous impression! Gotta love that!

By now the symmetry lovers must be going like whaaat...

I have a project idea just for you guys...

Boom! Check out this envelope :

Project #2

A damask shape, inked up and stamped across the edge of the envelope for a border.

Added some rhinestones and pearls with a healthy splash of glitter (you can use wink of stella / stickles / sparkle as a substitute) and there you have it!

One classy envelope with the lace effect going on because of that damask... trust me, the recipient will be mighty impressed.

So, as you can see, this set looks great with random damask shapes stamped as abstract or a single damask shape stamped in sync.

Close up :

What after symmetry, you ask?

Let's go with a curve!

Project #3

This mixed-media style ATC has that gorgeous damask curve running through it which makes it very striking to look at.

How did I do this?

Simple. Took my round box lid in which I store my crafting tools, and with that drew a curve lightly onto stenciled background.

Mounted damask stamp onto block, inked and stamped the little damask away.

Once the curve was done, I erased the line.

Here's a better look at it :

The sentiment for this ATC is from the Bold You stamp set.

Bonus Tip :

What else can you do with damask?

I am thinking shapes, squares, rectangles, zig-zags etc.

Go make a crazy colorful mandala using this and use your geometry box to make concentric circles as guides for stamping!

Fun, right? :D

So you see, the only limitation is your imagination! Get this set, sit with some inks and get crafting! No other stress buster like it!

Hope you liked my post and thank you so much for stopping by! :) I'd love to know what you think! *Hugs*


Posted via Blogaway