Showing posts with label Guest post. Show all posts

Wednesday, May 18, 2016

Guest Designer Ria Banerjee

Hello Crafty People,

This is Ria Banerjee, I blog at rbartfx.blogspot.in I am super happy to be Guest Designing this month.
Thanks to Vidushi for giving me this opportunity :)

Today I am going to show some of the projects that I did with the set that I received as my happy mail from Vidushi. The set- Flower in a Jar, is one such stamp set I have come across that has endless possibility to work with. Looking at the set only, gives you so many ideas. With this one set, you can assemble all the elements and even the smallest cute bee in one card but also you can use each and every element separately; I have tried to do the latter.

FIRST PROJECT:


For the first card that I have incorporated some painting skills of mine *grin* as the set gave me a beautiful picture to frame. I started with the Jar (the most beautiful element of the set). I stamped the Jar on a Water color Paper with two colors of distress inks viz. Gathered twigs from Tim Holtz distress inks and Green Garland from Artistry inks. First I stamped the Green on the stems and then the Brown on the rims of the jar to avoid merging these.


I loved the crisp image of the Jar and the stems. Then I took some water and a brush to wash the edges (but not too much) also by adding Broken china distress ink (to give a glass effect). I shaded the portion below the Jar with the same inks but this time the brown color on a greater proportion to get the dark shade.
Then I stamped all the flowers with Festive Berries Distress inks (to get the blotted effect) and shaded twice with the same ink to get some layers and finished it off with Gathered Twigs color for the last dark layer. For the leaves Green Garland again with the same technique as I did with flowers. Fussy cut all the flowers and the leaves and arranged it on the Jar simply by sticking it with glue.
I made some extensions to the bunch with the same used colors before to complete the picture. Lastly, the sentiment with some Archival Ink Black. And it’s done!!!!
With only Five colors the whole picture is complete :)


SECOND PROJECT:

For the second project I chose for a Tag. I took a cardstock, stamped the sentiment with Versamark and embossed it Black. I used a stencil and blended some Green Garland on it and again I stamped the Messy lines by Peek-a-Boo designs on it with the same color. I stamped the bunch of flowers separately and embossed it white. 


After that, I colored it with Peacock Feathers and Shaded Liliac distress inks and finished it with some sketching with dark blue, fussy cut them, and pasted it on the tags. And here it goes…


THIRD PROJECT:

My third project is again a card and again florals, as there are so many varieties of flowers to stamp, can’t get enough of one! I randomly stamped the roses with the leaves on a card stock. I colored it with Festive berries and Picked Raspberries, leaves with Mustard seed and Green Garland distress inks, and finished it off with some sketch pens (as they add the darkest shade I need all the times). The sentiment is embossed with white and here it looks like this…


FOURTH PROJECT:

My last project is with the tiniest stamp of the set, yes the BEE. The bee is too cute to ignore and I decided to make a whole card with the bee. I stamped, fussy cut, colored and pasted on a brown card stock. Made the edges on green with one of the designs from Its Plaid time by Peek-a-Boo. Some Mulberry flowers and a ribbon complete the Card.


Stamps used:


I hope you liked all my projects. Pardon me for making the post long :P

Happy Crafting and enjoy all the Peek-a-Boo stamps!


Hugs

Ria

Wednesday, April 27, 2016

Guest Post | Tejal Shah

Hello Everyone,

It is my absolute honor to take over the blog for today.. I am Tejal  and I blog at
Creative Expressions. When Vidushi asked me, if I would like to do a Guest post on this blog, I jumped in without a second thought.
She sent me two aaaaamazing stamps to play with and you will see the cards I made in a while.

Since I am such a review freak, let me spend two minutes to tell you about these stamps...
These were my first stamp sets from Peek-a-boo Designs and I was not sure what to expect.
They arrived with the perfect packaging, and via Fedex no less! That itself impressed me right away.

And the stamps...they stamp perfectly. Love the crisp impression..takes every ink easily (though I have yet to try distress inks with them) and THE BEST part...Permanent inks clean out so easily from them! I use my Clean Cham cloth to clean my stamps...and absolute no stains from using Versafine black ink. I totally love that fact.

Ok, So now lets jump into the stamp sets, shall we? And forgive me for such a long post and so many pictures, But I really hope you enjoy these cards as much as I enjoyed making them!
The first set that I used was called Little Wonder...Ah such a darling set with tons of cute images..Here is my first card with it...

I went back to my old love for CAS and completely went Clean with this card..


 I lightly penciled a heart and keeping that as my outline, stamped all the little stamps inside it..and then colored it all with my Zig Clean Clear Real brush markers.
Also gave a very faint blue halo wash to create a faint heart outline.
I curved the sentiment to fit on the heart and stamped with Versafine onyx black.
Matted on Black layering paper, and used foam tape to pop that up on a Dark Magenta cardstock.


 Added a dash of Diamond stickles to a few accent images like the hearts.

Then I decided I needed to shake things a bit...hehe..you got that right..I made a shaker card.


I used the sentiments to create a background for the shaker window..
Used a stitched heart die to cut into the background as well as the front of the shaker card..
I wanted the stitched lines to show through the window..


You can see the stitched lines...as well as the background..and the assortment of sequins that I used..
I simply loooove these sequins!! (Dare I show you my stash?? hehe..some other day!! )


I was in a fussy (the grammar nerd in me wants to point out, its fussy..not fuzzy cutting...noted? OK..lets move forward!!) So I was in a fussy cutting mode..and you will see in the next cards too..
I fussy cut the little elephant as well as the banner..All colored with Zig Real Brush Markers.
Sentiment stamped on a stitched rectangle mat, and ombre inked with distress inks..

Here is the set that I used for the above cards..Isn't it absolutely cute?

Coming to the Exclusive Stamp set for this month..You cannot buy it off the shop, you have to be a part of the Exclusive Stamp club to receive it..
Check out all the Details of the Exclusive Stamp Club and how to be a part of it. 
Click here to buy the Subscription to the Exclusive Stamp club.

Coming to the Cards.. I went a little scene crazy..ditched my CAS mode here..

I mean come on...look at the adorable critters...How can you resist them!! That Koala has my heart...
Since these were cute wild critters, I had to add some kind of wood-grain, and some foliage..


 I use my wood-grain folder for the base, inked with Brushed Corduroy distress ink.
Then cut out 3 circles with my double stitched circle dies. I had to re-emboss the panel, because while cutting the dies, it got flattened, which is where the cardstock cracked..
(TIP - Die cut first and dry emboss after that!)
And here are all the fussy cut critters, the bug and the snail and butterfly. Told ya, I went crazy!


 Wood-grain panel and critters are popped up on foam tape. Here in this close up, you can see all the amazing dimension to these critters and the foliage.

I have saved the best card for last (for me, it is anyways! )


I tried to create a 3D frame like effect...there are so many layers here..
The frame, the hills, the critters all are popped up on foam tape.

I die-cut the hills, grass, clouds from various dies..
Distress inked the sky, hills and grass also the trees.
Critters are colored with my Zig markers
(TIP - to give more dimension to the hills and tress, I used the same color, but used dotting motion. Darker on the top and fades while coming down, gives the impression of depth and fuller trees!)

And with the current selfie craze, I had to make the panda do a photo-bomb!! And he has that impish look..I could not help but put him there!

 Here's a peek at all the dimension.


 Here is how the whole set looks
So if you made it this far...Thank you so much for sticking with me!

Hope you enjoyed my cards and are inspired to try these stamp sets...They are awesome and Made in India..what more can you ask..
Thank you again Vidushi for this wonderful chance to be on your blog...

Much love
Tejal

Wednesday, April 20, 2016

Guest Designer | Hussena

Hello everyone!
This is Hussena here and I'm so happy to be guest designing for Peek-a-boo designs this month. I was sent two amazing stamp sets by Vidushi to work with and I had a really great time creating projects using them. The stamps are good quality and are a dream to work with!

So without further ado, let me show you the projects :)

First up is a card I made with the Flowers in a Jar set. To create this card I first stamped and heat embossed all the images on a watercolor paper using Versafine Onyx Black ink and clear embossed them. Then I watercolored my images using Distress inks, once dry, I fussy cut them and foam mounted them on my card base and created a diagonal design in the bottom half using washi tapes to add interest. The sentiment is from the same set and was stamped and heat embossed directly on the card base using Ranger's Super Fine Gold embossing powder.


To make my second card, I first created my background using Texture Paste mixed with Peacock Feathers Distress ink using a Heidi Swapp stencil. Then I die cut a circle using Spellbinders Nestabilities Circle dies and sponged it using Distress inks and foam mounted it on my card base. Then I stamped the flowers, leaves and the buds from the Flowers in a Jar set heat embossed it using Super Fine Gold embossing powder from Ranger and directly colored my images using a sponge dauber and Distress inks and fussy cut them before placing them on my card base. Added a few sequins to finish my card.


To create my third card, I again stamped and heat embossed the flowers and foliage from the Flowers in a Jar stamp set and colored it using Distress inks. This time I fussy cut the flowers separately and foam mounted them against the trellis background which I have made using various dies. The background is dry embossed using an embossing folder and lightly painted using Distress ink Peacock Feathers.


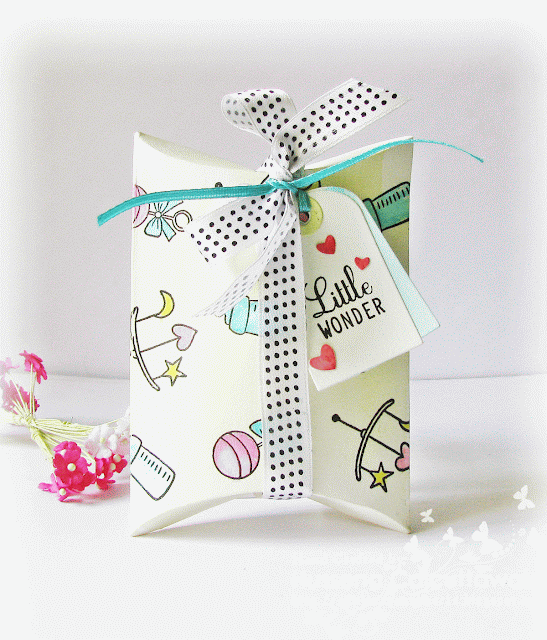
Next up are some really cute projects I created using the Little Wonder stamp set. This stamp has some of the cutest images which work very well for creating some adorable embellishments too :) I decided to create my own pattern paper using the small images from this set, so I directly stamped and clear embossed three of the images from this set and lightly colored in using Distress inks again! Once my pattern paper was ready, I made a pillow box out of it. Tied a bow using satin ribbon and added a tag to it which is again stamped from the Little Wonder set.


This cute gift tag is also created using the Little Wonder stamp set. Both the image and the sentiment are from the same set. I have off-setted the tag using another tag on the back with a strip of Washi Tape.


I created two Onesies, one is a card and other a tag. The central image is stamped and colored using different mediums. On the card, I have colored it using watercolor pencils and on the tag I have used markers to color my image.

Onesie Card

Onesie Tag


Hope you all like my projects. I had so much fun creating with these sets. Do let me know your views regarding it. Would love to hear from you. :)

Thank you once again, Vidushi for this opportunity to Guest Design for Peek-a-boo.

Wednesday, March 16, 2016

Guest Designer Post

Hello Friends ! Pooja here I am very excited to share my projects as Guest Designer for Peek a Boo Designs.I would like to Thank  Vidushi  Saraf  and the entire DesignTeam for giving me this opportunity . I was very happy to receive these wonderful made in India clear Stamps from PABD .

Clear stamps from PABD Stringy sentiments Happy holi,DMask
They have excellent  quality I can tell you as I have used them with pigment inks, dye inks ,Distress inks and embossing inks too .Each time the result was clear crisp image.
I made a bunch of cards using them. Sharing the Holi cards first. I loved the bold happy holi sentiment no need to add much on cards.

Happy Holi card
Did you recognize the flowers ? Yes "Palash " also aptly called Flame of Forest .It is said that nature plays holi through them .I am Lucky to have seen palash trees in full bloom so many times. Hand drew and watercolored the flowers and stamped the sentiment.Some ink smooshing in the background after all is a holi card !
Next  is One layered CAS card . Stamped happy holi with multiple inks ,masked it and literally played holi with watercolors on the card.Stamped few leaves n flourishes for interest.

Happy Holi card with mutli ink stamping & masking
Now the cards with Damask Stamp set, This stamp set has wonderful patterns and so many possibilities of using them on projects we can create beautiful patterns, backgrounds,embellishments ,flourishes and even labels for sentiments.

2 tone stamping with pigment Inks
  For this card I created the background by 2 tone stamping with pigment inks.I have used the smallest image from this set to create the pattern and the sentiment is from Stringy Sentiments.
Background created by heat embossing damask pattern
Coming to last card, heat embossed the pattern and then sponged Salty oceans Distress ink. Embellished with readymade flower (Gift from Shalu ) ,the leaves are from this stamp set and I also used the small flourish designs to create the label .

Now the Final project an Altered box.I have altered black packaging box. 

Altered box
Stamped the damask pattern with versamark  ink and then brushed loose metallic powder on it .
Pattern created with small flourish stamp
Got a nice vintage gold pattern which made the box look elegant ,No need of any additional embellishments just added few pearls.I hope you all loved the card and box and are inspired to try out this wonderful stamps.(I will be sharing few more pictures of the projects on my Blog) My Heartfelt Thanks to PABD Team for the amazing stamps and a chance to share my project on the blog !