Showing posts with label little wonder. Show all posts

Sunday, December 11, 2016

Challenge #12 Inspiration By Bilovodenko Nadiya

Hi PABD fans! Today me Nadiya Bilovodenko is here on the fabulous Peek-a-boo Designs  blog with my inspirations projects! and today I did two projects for you. Christmas calling!!! you hear it? The air is already hovering flavor of New Year holidays,  here in Ukraine. I came with some more inspiration for challenge #12 which is a color challenge.
I do a lot of cards to my friends and relatives. Who said, that PABD No Christmas stamps? Let's look together!
 If you have a set of stamps Solid Shapes , can feel free assume that the New Year you have come!
 I took a star stamp on paper pastel purple made embosing white powder, then cut along the contour.
 Background I've done with the help of structural paste and stencil bubbles.
 Then I painted the background with a conventional art of watercolor.
 Who said that our palette can not be the New Year! It may be, let me assure you!


My cards look almost the twins!


I wish each of you good mood and wonderful holidays, regardless of our religion, and faith! Holidays and New Year, it wonders, let us believe in miracles!


AT my projects i'm used:


Wednesday, April 27, 2016

Guest Post | Tejal Shah

Hello Everyone,

It is my absolute honor to take over the blog for today.. I am Tejal  and I blog at
Creative Expressions. When Vidushi asked me, if I would like to do a Guest post on this blog, I jumped in without a second thought.
She sent me two aaaaamazing stamps to play with and you will see the cards I made in a while.

Since I am such a review freak, let me spend two minutes to tell you about these stamps...
These were my first stamp sets from Peek-a-boo Designs and I was not sure what to expect.
They arrived with the perfect packaging, and via Fedex no less! That itself impressed me right away.

And the stamps...they stamp perfectly. Love the crisp impression..takes every ink easily (though I have yet to try distress inks with them) and THE BEST part...Permanent inks clean out so easily from them! I use my Clean Cham cloth to clean my stamps...and absolute no stains from using Versafine black ink. I totally love that fact.

Ok, So now lets jump into the stamp sets, shall we? And forgive me for such a long post and so many pictures, But I really hope you enjoy these cards as much as I enjoyed making them!
The first set that I used was called Little Wonder...Ah such a darling set with tons of cute images..Here is my first card with it...

I went back to my old love for CAS and completely went Clean with this card..


 I lightly penciled a heart and keeping that as my outline, stamped all the little stamps inside it..and then colored it all with my Zig Clean Clear Real brush markers.
Also gave a very faint blue halo wash to create a faint heart outline.
I curved the sentiment to fit on the heart and stamped with Versafine onyx black.
Matted on Black layering paper, and used foam tape to pop that up on a Dark Magenta cardstock.


 Added a dash of Diamond stickles to a few accent images like the hearts.

Then I decided I needed to shake things a bit...hehe..you got that right..I made a shaker card.


I used the sentiments to create a background for the shaker window..
Used a stitched heart die to cut into the background as well as the front of the shaker card..
I wanted the stitched lines to show through the window..


You can see the stitched lines...as well as the background..and the assortment of sequins that I used..
I simply loooove these sequins!! (Dare I show you my stash?? hehe..some other day!! )


I was in a fussy (the grammar nerd in me wants to point out, its fussy..not fuzzy cutting...noted? OK..lets move forward!!) So I was in a fussy cutting mode..and you will see in the next cards too..
I fussy cut the little elephant as well as the banner..All colored with Zig Real Brush Markers.
Sentiment stamped on a stitched rectangle mat, and ombre inked with distress inks..

Here is the set that I used for the above cards..Isn't it absolutely cute?

Coming to the Exclusive Stamp set for this month..You cannot buy it off the shop, you have to be a part of the Exclusive Stamp club to receive it..
Check out all the Details of the Exclusive Stamp Club and how to be a part of it. 
Click here to buy the Subscription to the Exclusive Stamp club.

Coming to the Cards.. I went a little scene crazy..ditched my CAS mode here..

I mean come on...look at the adorable critters...How can you resist them!! That Koala has my heart...
Since these were cute wild critters, I had to add some kind of wood-grain, and some foliage..


 I use my wood-grain folder for the base, inked with Brushed Corduroy distress ink.
Then cut out 3 circles with my double stitched circle dies. I had to re-emboss the panel, because while cutting the dies, it got flattened, which is where the cardstock cracked..
(TIP - Die cut first and dry emboss after that!)
And here are all the fussy cut critters, the bug and the snail and butterfly. Told ya, I went crazy!


 Wood-grain panel and critters are popped up on foam tape. Here in this close up, you can see all the amazing dimension to these critters and the foliage.

I have saved the best card for last (for me, it is anyways! )


I tried to create a 3D frame like effect...there are so many layers here..
The frame, the hills, the critters all are popped up on foam tape.

I die-cut the hills, grass, clouds from various dies..
Distress inked the sky, hills and grass also the trees.
Critters are colored with my Zig markers
(TIP - to give more dimension to the hills and tress, I used the same color, but used dotting motion. Darker on the top and fades while coming down, gives the impression of depth and fuller trees!)

And with the current selfie craze, I had to make the panda do a photo-bomb!! And he has that impish look..I could not help but put him there!

 Here's a peek at all the dimension.


 Here is how the whole set looks
So if you made it this far...Thank you so much for sticking with me!

Hope you enjoyed my cards and are inspired to try these stamp sets...They are awesome and Made in India..what more can you ask..
Thank you again Vidushi for this wonderful chance to be on your blog...

Much love
Tejal

Wednesday, April 20, 2016

Guest Designer | Hussena

Hello everyone!
This is Hussena here and I'm so happy to be guest designing for Peek-a-boo designs this month. I was sent two amazing stamp sets by Vidushi to work with and I had a really great time creating projects using them. The stamps are good quality and are a dream to work with!

So without further ado, let me show you the projects :)

First up is a card I made with the Flowers in a Jar set. To create this card I first stamped and heat embossed all the images on a watercolor paper using Versafine Onyx Black ink and clear embossed them. Then I watercolored my images using Distress inks, once dry, I fussy cut them and foam mounted them on my card base and created a diagonal design in the bottom half using washi tapes to add interest. The sentiment is from the same set and was stamped and heat embossed directly on the card base using Ranger's Super Fine Gold embossing powder.


To make my second card, I first created my background using Texture Paste mixed with Peacock Feathers Distress ink using a Heidi Swapp stencil. Then I die cut a circle using Spellbinders Nestabilities Circle dies and sponged it using Distress inks and foam mounted it on my card base. Then I stamped the flowers, leaves and the buds from the Flowers in a Jar set heat embossed it using Super Fine Gold embossing powder from Ranger and directly colored my images using a sponge dauber and Distress inks and fussy cut them before placing them on my card base. Added a few sequins to finish my card.


To create my third card, I again stamped and heat embossed the flowers and foliage from the Flowers in a Jar stamp set and colored it using Distress inks. This time I fussy cut the flowers separately and foam mounted them against the trellis background which I have made using various dies. The background is dry embossed using an embossing folder and lightly painted using Distress ink Peacock Feathers.


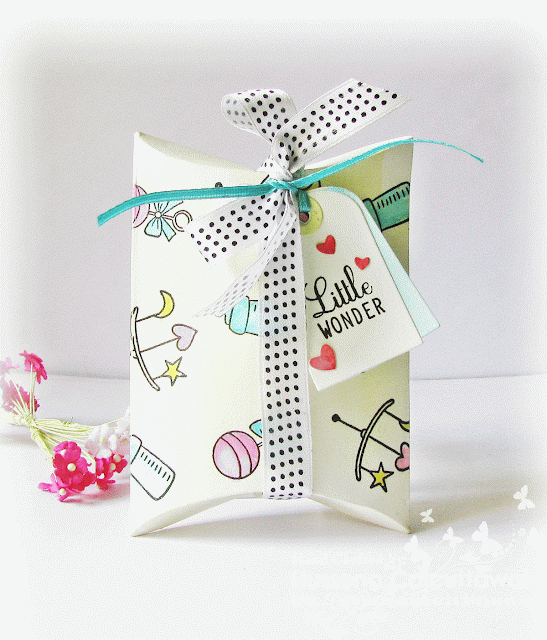
Next up are some really cute projects I created using the Little Wonder stamp set. This stamp has some of the cutest images which work very well for creating some adorable embellishments too :) I decided to create my own pattern paper using the small images from this set, so I directly stamped and clear embossed three of the images from this set and lightly colored in using Distress inks again! Once my pattern paper was ready, I made a pillow box out of it. Tied a bow using satin ribbon and added a tag to it which is again stamped from the Little Wonder set.


This cute gift tag is also created using the Little Wonder stamp set. Both the image and the sentiment are from the same set. I have off-setted the tag using another tag on the back with a strip of Washi Tape.


I created two Onesies, one is a card and other a tag. The central image is stamped and colored using different mediums. On the card, I have colored it using watercolor pencils and on the tag I have used markers to color my image.

Onesie Card

Onesie Tag


Hope you all like my projects. I had so much fun creating with these sets. Do let me know your views regarding it. Would love to hear from you. :)

Thank you once again, Vidushi for this opportunity to Guest Design for Peek-a-boo.

Monday, April 18, 2016

Little Wonder!

Hello Everyone!

Finally I am back here to share some of my projects that I made using my all time favorite theme.

Before I start, with months I see some beautiful projects coming up and so I am hoping you all are playing along our monthly challenge which is Challenge #5

Its a very interesting challenge and also forces you to go beyond your imagination. So here we go with my take on the challenge.

I have made 3 projects using the Little Wonder Stamp set which is a absolute complete stamp set when one has to make any baby theme projects/cards/invites/favor/etc.


Project 1: Invites


Its a pocket invites with the invite details on one side and one side having the layout for a baby shower/birthday or any occasion.


The coloring that you see are using distress inks and some with pencil colors. The pocket is embossed and using some laces have embellished it. Again its a boy theme hence kept it blue and green.

Project 2:

My second project is heavy embellished baby card. I have kept it a general theme and hence can be used for a boy or a girl.


All the pieces are made 3D with raised embellishments from the stamp set.

Project 3:

The third project is a simple gift bag which will compliment any of the above project either on gifting or any favors.


The Doily that you see here is a paper doily that you get locally in any cake shop. I have used 3 - 4 to make it thicker and then used distress ink to color it. 

The sentiment is from the same set with a added star :).

Hope you like and this shall inspire you and give you some ideas to play along our challenge this months.

The " little Wonder " set used in all these projects is a very apt set for any projects used. You can have a look at all the other stamp set that we have in this month here.

Thanks for stopping by and do let me know how you like it.
Lots of love !