Showing posts with label altered art. Show all posts

Sunday, December 11, 2016

Challenge #12 Inspiration By Bilovodenko Nadiya

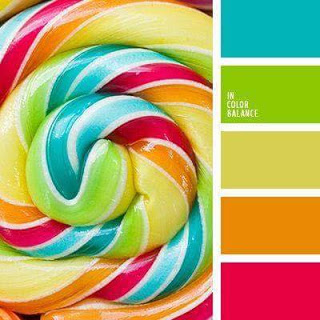
Hi PABD fans! Today me Nadiya Bilovodenko is here on the fabulous Peek-a-boo Designs  blog with my inspirations projects! and today I did two projects for you. Christmas calling!!! you hear it? The air is already hovering flavor of New Year holidays,  here in Ukraine. I came with some more inspiration for challenge #12 which is a color challenge.
I do a lot of cards to my friends and relatives. Who said, that PABD No Christmas stamps? Let's look together!
 If you have a set of stamps Solid Shapes , can feel free assume that the New Year you have come!
 I took a star stamp on paper pastel purple made embosing white powder, then cut along the contour.
 Background I've done with the help of structural paste and stencil bubbles.
 Then I painted the background with a conventional art of watercolor.
 Who said that our palette can not be the New Year! It may be, let me assure you!


My cards look almost the twins!


I wish each of you good mood and wonderful holidays, regardless of our religion, and faith! Holidays and New Year, it wonders, let us believe in miracles!


AT my projects i'm used:


Friday, August 5, 2016

Color insperations and tutorial by Nadiya Bilovodenko

Hi PABD fans! Today me Nadiya Bilovodenko is here on the fabulous Peek-a-boo Designs  blog with my inspirations for  #9 Color challenge. The wide palette makes it possible to create miŃ…ed media projects and I made a tag. Hop on along with me to see what I have made.


 My tag is large. And I played with stamps and stencils.


 And some close up:


And now my master class:

1. Get your tag, stamps, watercolor paints, stencils.


2. In random order, apply watercolor paint on the tag. Once dry apply the stamps.


3. Put distress ink through a stencil.


 4. Apply any medium of your choice through some other stencil.


5. Cut the stamped mandala.


 6. Assemble the composition. Apply randomly stamps. Add splashes of white and black gesso.
 

Thank you for staying along with me !!


 Do hop one to our new Challenge #9 Color


In my projects I have used:
Arrow stencil 
Bold Butterflies
Bubbles stencil
Mandala
 Positive Vibes


Friday, July 22, 2016

Peek-A-Tute Friday with Ria

Hello Everyone,

This is Ria again on this side with some projects on your favorite Friday! I hope you all are enjoying the July release and I am already seeing fabulous projects by everyone.

Are you taking part in this month's challenge Challenge 8 - Onlylayers


I am here today with three new projects going with the month's challenge theme. Let us move onto the projects:

FIRST PROJECT:

My first project is an altered glass bottle. I have made the project in four easy steps:


Step 1: Using your distress inks, stamp the butterflies from Bold butterflies of every size on a paper (I have used scrap paper and I never throw scraps and better use for these tiny stampings). I have also cut some tiny butterflies using a paper punch.

Step 2: Fussy cut the butterflies, blend the same ink on it by which it was stamped and I have used some bling with Wink of Stella.

Step 3: Cover the body of the bottle with acrylic colors with a sponge. Let it air dry for few minutes.
Step 4: Apply the texture paste on it through Leafy Delight Stencil. Let it dry. And then cover partially the same acrylic colors on it.

I have finished it by sticking the butterflies on it- on an ascending order. Placed all the three word diecuts from July release and some sequins.


SECOND PROJECT:


I have come to know about the transparent cards last month and wanted to try this asap. I have made the night scene with Festive berries, Blue Chase & Grape vine from artistry inks; with some mist and white acrylic.
Stamped the fairies, colored the wings, fussy cut them and adhered them to the margins. The sentiment is also from the same set. I have stamped the stars from the solid shapes set and embossed them with Enchanted Gold. Its done!


THIRD PROJECT:


My third project is a card this time. Made the background with the BOX-tacular stencil with some mist and pearl effect on it. Stamped and colored the flourish from the Humming blossom Set. Cut it into an oval shape, adhered on a black foam and then on the background, finished with some enamel dots and sequins!


SUPPLIES USED


I hope I have done justice to the mixed media and the transparent card with my first trials. 

Do not forget to avail these awesome collection that too on a discount by applying the code RIA_10


Thanks for stopping by
Hugs
Ria


Friday, July 15, 2016

Peek-A-Tute Friday : Altered Mini note books - Daksha

Hello! crafty friends

Hope you are enjoying the work done by our DT members, using July months PEEK-A-BOO designs
 As you all know that this month theme is LAYERED PROJECTS..so don't wait and participate in this months challenge..more details HERE
 Today I am here with 2 projects
# 1.Tutorial on Altered mini note books
# 2.Altered phone book

PROJECT # 1 Altered mini note books

These note books are very easy to make and you can try them with your basic skill and stuff...So with no further delay lets start...

Note book #1


note book #2


note book #3


note book #4


note book #5


TUTORIAL: Altered mini note book

STEP -1 -First take the measurement of mini note book,that you want to alter.Take a cardstock of your choice (here I have taken black CS) to cover my mini note book.Cut to exact size of your notebook.
STEP -2 Stick this  or cover this black CS on notebook with glue or red tacky tape,press properly on all sides and barnish it. Your cover is ready..now to decorate ....


STEP-3 for 2nd layer take any coloured CS 1/4" smaller than the front cover of the notebook (here I have used light pink CS.you can use any pattern paper also but I have made my own pattern paper using stamp so that it matches with my theme.I stamped ice-cream image with black Archival ink on light pink CS and  my pattern paper is ready.
STEP - 4 Stick this PP on the front of note book 


STEP - 5 Then I have taken white diecut piece using smallest die from oval dual stitched die set and on that I have stamped the sentiment  with black ink,and stuck the water coloured image of ice-cream stamp with foam dots
STEP - 6 Finally highlighted with black colour rhinestones and given stitched boarder all around using black marker pen.
N.B: If your notebook binding is thicker and bigger in size then covering with CS will not work ,it will open up from the hinge or binding parts. With bigger and thicker notebook or Diary we need to cover both front n back( leaving hinge part )..with CS and then hing part or binding part we have to cover with separate piece of CS or with binding tape or decorate sides with laces.Process can be vice versa also like hinge part can be covered first n then front n back ..depending on your designs


For Peek-a-boo designs products click HERE


Supplies used


PROJECT #2 Altered phone book

In this project ...my phone diary is in dark green colour so I don't need to cover it with CS..only I have layered it with pearl cream card stock,then black and finally I have distressed layer.For distress layer I have used  distress inks -shabby shutter ,scattered straw,peeled paint,chipped sapphire. Then misted with water using very fine spray bottle.Dried immediately with heat gun.Again misted with perfect pearl mist spray to get pearly misted look.Then used Graceful lattice die cut in white,on that I have used Oval dual stitched die cut frame which I have used as  photo frame with vintage photo...Finally to decorate oval frame I have used stamped layered Dahlias and leaves..used word INSPIRE die cut in black n decorated with metal charms in all four corners and a dragonfly using E6000


Supplies Used :


Are you enjoying the ongoing discount cum sale ....for discount coupon code please use .....DAKSHA_10

Thanks for stopping by...hope you liked both of my altered projects as much as I loved making them
Love n hugs 
DAKSHA