Monday, October 31, 2016

October release inspiration by Bilovodenko Nadiya

Hi PABD fun's))) Today Nadiya Bilovodenko is here. I really liked our October release, and I played with them. Let's see what I did?
this is my first project - a simply card.
Background i made use a new stencil Abstract Triangle -
I put modeling paste and added the blue color using watercolor.


 basic details, I did stamp Solid Shapes and cut them along the contour.
 The inscription done by means of hot embossing golden powder and Bold Hugs and Love set.


 my second project - a money gift envelope.
I took a video tutorial for you as it is fast and easy make the.


 Close-up


 Here is tutorial


The third project is an experiment for you - Men's card.
I made a stamp from the set 
and then I just turned and made a stamp imprint of the reverse side.
 Then I cut out the circle and glued it on the black сardstok
Inscription made of white powder with hot embossing.
 I think it came out unusually an attractive and manly.


In my projects i used:


Enamel dots Rose Quartz


Bold Hugs and Love
set

Solid Shapes


 Abstract Triangle
set


Sunday, October 30, 2016

Happy Diwali with challenge reminder!

Hello and good afternoon dear friends!

Here's wishing you all a very happy and prosperous Diwali from the entire Peek-a-boo Designs team!

I'm Halak and I'm here to remind you amidst the festivities that we have Challenge #11 - Recipe running wherein you can participate for a chance to win a voucher which you can use to pick up some PABD awesomeness!

Here are the challenge guidelines :

Main Ingredients :
1/4 cup of the color red
1/4 of gold as well
Number 1 - Since we celebrate our first birthday in October

Garnishing (the twist ) :
Use atleast one of the the following :
stenciling
3d Layered projects
Make your own background with stamps
dash of glitter

Directions :
Make a delicious project using all the ingredients above and adding at least one garnish (the twist) of your choice.
Participants with a project with an Indian touch since we celebrate Diwali and other festivals in this month will get some bonus points.

PABD cutting dies are very versatile and can be used to make some fantastic projects!

You can create fun cards, scrapbooks, invites.. the list is endless!

Today I'm sharing a card I created as per Challenge #11 specifications to welcome the new year.

Tip : Buying a number die is a great investment because you can use it to create custom birthday cards, new year greetings, save the date invites etc.!

For my project, the background was created using the abstract triangle stencil. Once I stenciled it in pink, I offset the stencil and stenciled it in yellow to give it that two-toned effect.

The dies that were used are :
Rounded rectangle dual stitched die
Numbers die and
Celebrate word die.

Apart from this, I used the gorgeous Rose Gold cardstock from PABD. (Seriously guys, this cardstock is a must. Absolutely gorgeous!)

So, what are you waiting for! Read the recipe of Challenge #11 and cook up a fun crafty project!

Last day to enter is 31st October 2016, so... hurry!

To participate, click >>> HERE

List of Peek-a-boo Designs (PABD) products used :

Thank you so much for stopping by! *Hugs*


Posted via Blogaway

Friday, October 28, 2016

SIMPLY BACKGROUNDS USING DIFFERENT ELEMENTS

Hello crafty friends, Martha Lucia here to share with you three cards that I made using different techniques to create the backgrounds. I love how I can use stencils, die cuts and stamps to change the look of my creations. Take a look of my first card:


This is a Save the Date card. To make this I used the Abstract Triangle Stencil, the Save the Date Stamp and the Heart Butterfly Die Cut. Creating this was very fun:

1. Cut the base of the card using Cajun Craze card stock. The size is 4-1/4"x11" with score in 5-1/2".
2. Cut a second layer using natural card stock. The size is 4-1/8"x5-3/8".
3. Take the stencil Abstract Triangle, place and secure it over the natural card stock.
4. Spray the free areas of the stencil with Glimmer Mist. I used two different colors from Tattered Angels, Golden Orange and Pink Poodle.
5. Remove the stencil and wash it with water.
6. Stamp the Save the Date image over the decorated layer using VersaFine Onix and Clear Embossing Powder. Melt the powder with the heat tool.
7. Paste the layer over the card base and decorate with a Heart Butterfly Die Cut.

For the background of the second card I used the Messy Background combined with the Scallop Rectangle Die Cuts, Thank You Die Cut and Dual Leaf Die Cut


Creating this was a very simple process:

1. Cut the base of the card using Very Vanilla card stock. The size is 4-1/4"x11" with score in 5-1/2". 
2. Cut a second layer of Very Vanilla card stock. The size is 4-1/4"x5-1/2".
3. Stamp the Messy Background image over the second layer using Kaleidacolor Ink. I used the Tomato Vine Color selection.
4. Paste the second layer directly over the card base.
5. Cut the large scallop rectangle frame using Early Espresso card stock and paste over the card using dimensionals.
6. Cut the Thank You die cut and the Dual Leaf die cut using Gold foil paper.
7. Paste the die cuts over the stamped background and decorate the union of the leafs using an Smoky Quartz Enamel Dot.

The background of my last card was created using only die cuts. For this I used the Swirl Flourish and the Thank You word die cut.


I think this card is very elegant and simple:

1. Cut the base of the card using Basic Black card stock. The size is 4-1/4"x11" with score in 5-1/2". 
2. Cut a second layer using Very Vanilla card stock. The size is 4"x5-1/4".
3. Cut two of each Flourish swirls using real red card stock.
4. Add adhesive to each swirl. If you want you can use the Xyron Sticker Makers.
5. Arrange and paste the swirls over the very vanilla layer.
6. Cut the Thank you word using Basic Black card stock and add the adhesive too.
7. Paste the word over the decorated layer.
8. Paste the decorated layer over the card base.
These are the products that I used for these cards:


I hope you've submitted your entry to our October challenge . If not, do it soon, there are only a few days left to win the Gift voucher.

Thank you for stopping by and see you soon with something special and new because, for me, new release is new inspiration!


Thursday, October 27, 2016

Inspirations for October release #PABD

Hello! crafty friends
All must be busy with festivities and its preparations. I will not take much of your time ...this is my last post for this month using October release products from #PABD

My First Project : Thank You card


1.For the background I have used #PABD thank you stamp set,then used #PABD october release stencil ...colors used- tumbled glass,mustard seed and evergreen bough.
2.used 1'' white CS strip for the sentiment...on that used black circle diecut from double stitched  scalloped circle die from #PABD..
3.finally embellished with distressed doodled butterfly #PABD and THANK YOU die cut from #PABD ...using three layers of diecuts...used Spectrum noir clear glitter pen on butterfly to highlight it .and wired pollens for butterfly's antenna.

MY SECOND PROJECT : doodled butterfly card


1. For the background I have used doodled butterfly #PABD stamp on red CS , I stamped with versamark and heat embossed with superfine clear embossing powder (Rangers).
2. Stamped doodle butterfly with versafine black ink on white CS and heat embossed with Ranger's clear embossing powder. Then used Spectrum noir clear glitter pen to highlight it ... fussy cutted it..and used in the center of my background . 
3. For the sentiment I did same heat embossing....used #PABD doodled butterfly sentiment and gave wave banner shape...used burlap thread at the bottom of this sentiment banner
4. Finally highlighted with few black sequences, did matting with black CS and used white folded  card base.

MY THIRD PROJECT :Feathers card


1. On the canson watercolor paper I did smoshing technique using distress inks, acetate sheet and water mister..did black splatters with black distress ink and water.
2. For feathers I stamped #PABD feathers stamp on watercolor paper with versamark and heat embossed using gold embossing powder ....colored the images with Zig water color pens... then fussy cutted...used three feathers on water colored background ...used burlap thread  bow and a wooden  button.
3. For the sentiment I have used black CS and gold heat embossing...used enamel dots.
4. Finally did matting with gold CS and used white folded card base.
      
  Thank you all for stopping by....HAPPY DIWALI AND PROSPEROUS NEW YEAR TO ALL ...in advance
LOVE
DAKSHA

 SUPPLIES USED :


Wednesday, October 26, 2016

Untraditional Diwali Card

Hello Everyone,

We all are busy with Diwali festivities here in India... 

I am sharing with you a non traditional Diwali card which I made with Peek-aboo Designs new Floral Bloom stamp set .


I've colored the flowers with Zig watercolor markers. 

I've another tag to share with you today..


for this tag I've used PABD Swirl Flourish die in the background. 

Products used from PABD

Swirl flourish die


Floral Bloom stamp

Enamel Dots
Rose quartz

Thanks so much for stopping by.


Tuesday, October 25, 2016

Create a Night Scene - 1 Background 3 Completly Different Cards

Hello Crafty Friends,

Its me again..
How are you doing? I guess you all will be busy, as Diwali as just in the corner. HAPPY DIWALI in advance, have a Prosperous Diwali.

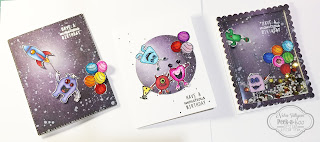
Now for the cards. Today I felt like creating the sky, that's similar to the Diwali Night - all dark but still full of lights (I hope you guys understand what I'm trying to say) And to add a twist I used few monsters to create Montrous scene using MONTROUS Stamp Set.
These really made some awesome Birthday cards.


I'm sure you guys are cravng for some close-ups. These actually turned out pretty good. Loved each card and you will see, each card is completely different in style. 


First card, where you can see the whole night scene - a monster with a bunch of balloons hanging from a rocket. I know this is what monster suppose to do - impossible. I love love love this scene and I smile everytime I see this card. And the face of the monster makes it look like its been dragged by the rocket - a perfect fit for this card..


My next card is a Shaker card, I used the large die from Scalloped Rectangle Die Set. And used the scallop frame to create the well for my shaker. Its quite thin frame but the used my foam tape and trimmed it to 1/4th size, to fit the frame and create the shaker.


For my third and last card here, I used the large die from Scalloped Circle Die Set but  didn't use the scallop frame that cuts along with the circle. I really liked the simple but still classy look of this card. Its just great.


So now without taking much of your time let me share the video tutorial with you guys.


To watch on YouTube click HERE


Materials Used :-

Dual Stitched Rounded Rectangle
Scallop-rectangle
Scalloped Circle 
Monstrous

Thank you for visiting..
Have a Great Day...