Showing posts with label mixed media layout. Show all posts

Monday, November 27, 2017

Crafting with Preeti D.- Part 3

Hello Dear Crafty Friends!

Hope you had a blessed Thanksgiving and had fun shopping during the Black Friday weekend :)

Today, I have 1 Mixed Media Layout and 2 CAS cards to share with you.

1. Mixed Media Layout: Baby Girl


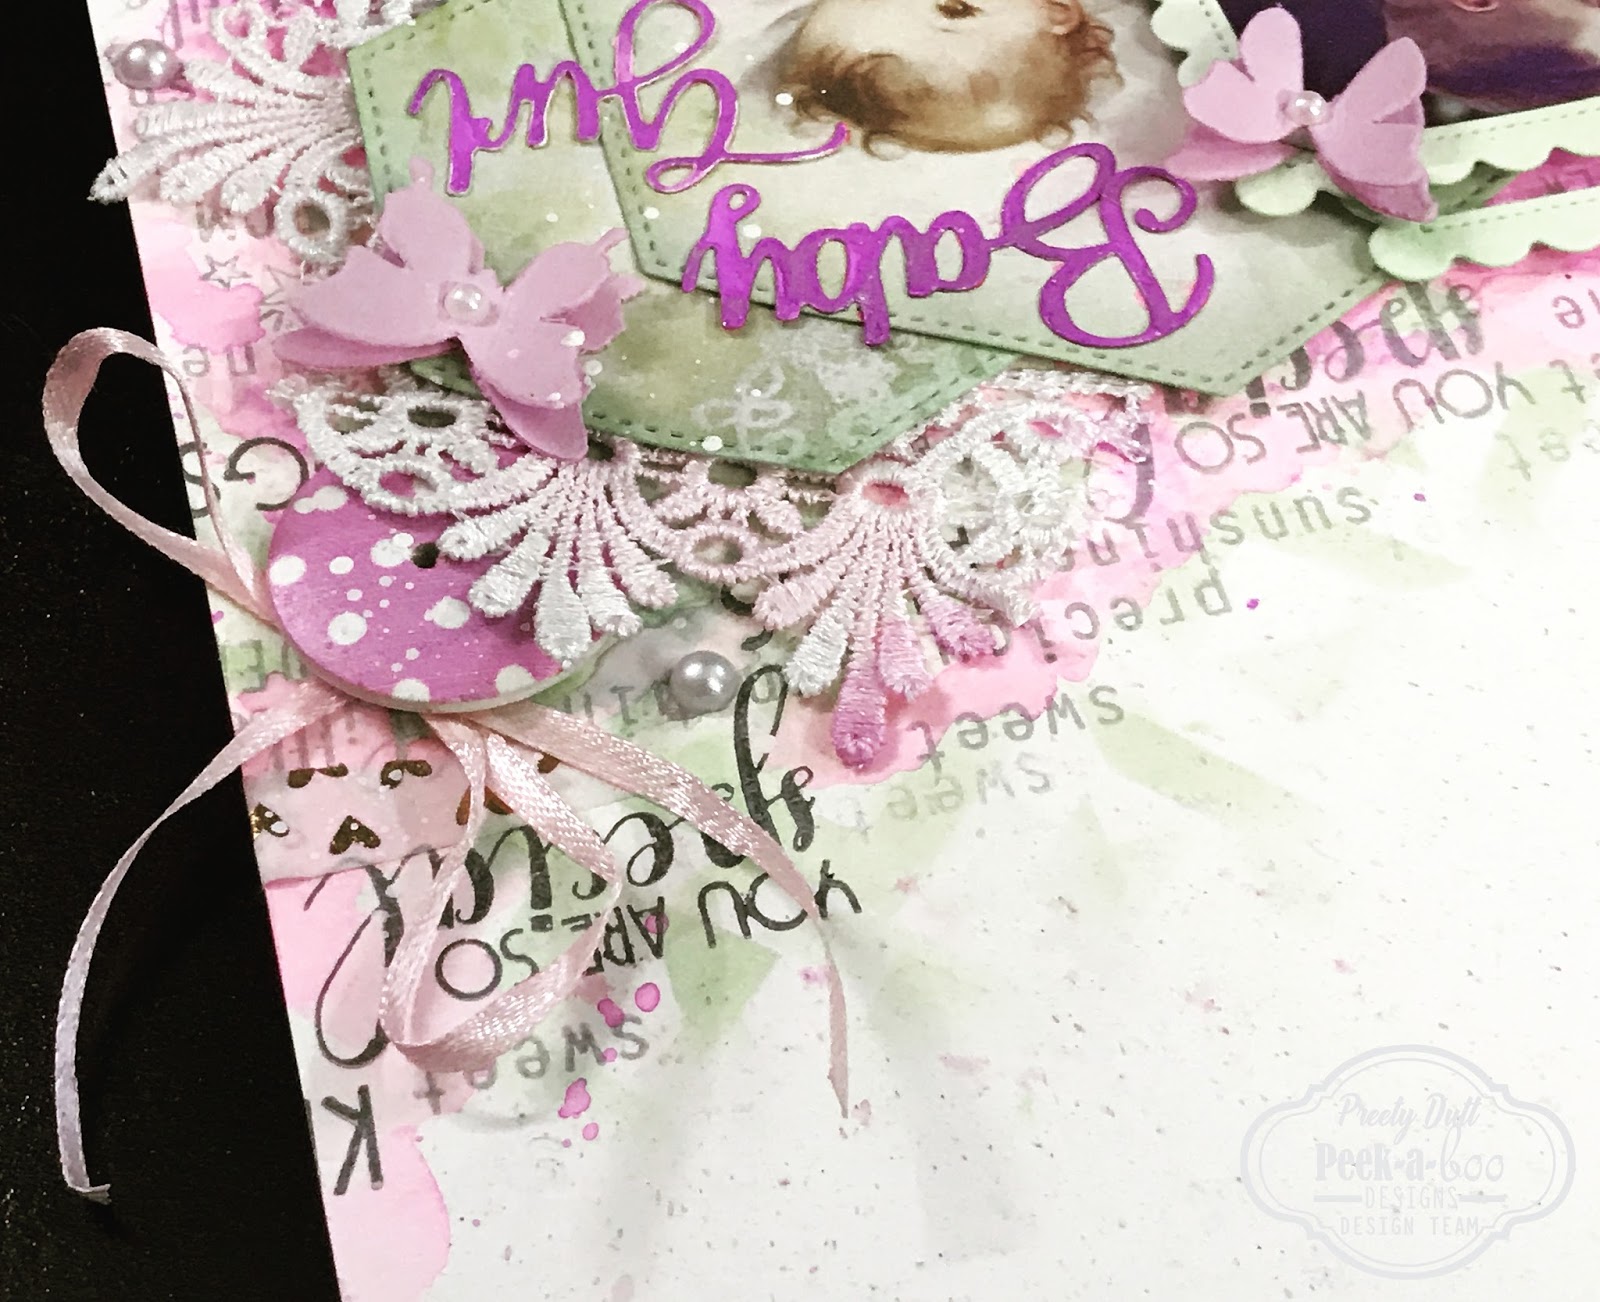
Here are some close-up photos of the layout:


Process:

1. Created the background by first adding color to the 12 by 12 piece of white cardstock using sprays 
2. Did background stenciling with the Abstract Triangle Stencil & Cracked Pistachio Distress Oxide. 
3. Then did background stamping with grey archival inks using apt words from these stamps: Ampersand, With Love Daisy, Bold You & Little Wonder
4. Die cut frames with the Scallop Rectangle die, a few cute baby patterned papers with the new Stitched Hexagon Dies & the title using the new Baby Girl Word Die. Then Colored the die cuts with distress oxides/sprays.
5. Layered and adhered all the elements including the die cuts & embellishments (buttons, ribbon bows, laces, pearls, butterflies) using foam tape and tacky glue. 
6. In the end, did some additional stamping, added a few strips of Lovey Dovey Washi tape & created splatter with white gesso 

2. CAS Card: Shine & Sparkle


Process:

1. Heat embossed the sentiment in Gold on Navy Blue Cardstock using the Ampersand Stamp
2. Die cut the "&" in white using the Ampersand Trilogy Die set  & adhered it 
3. Die cut the navy blue cardstock using the new Stitched Hexagon Die set 
4. Adhered the die cut to an A2 sized white cardbase, added a strip of glittery gold washi tape & Golden Days Washi Tape at the top
5. Finished the card with a few gold sequins. 

3. CAS Christmas Card


Process:

1. Heat embossed the pretty flower from the new Poinsettia Stamp in gold on watercolor paper
2. Colored the image with Festive Berries Distress Ink Refill, then fussy cut it
3. Die cut chocolate brown cardstock using the Dome Tower Die & heat embossed the sentiment from the Poinsettia stamp onto the die cut.
4. Assembled the card by foam mounting the die cut & flower onto a cream cardbase 
 5. To embellish the card used gold sequins, a bit of washi tape at the bottom and a few dots of red stickles.

PABD Supplies Used:


Baby Girl Die- New Release
Hexagon Die- New Release

Poinsettia Stamp


That’s all for today.

In case. you'd like to see more of my projects using the beautiful PABD supplies, 
you can check out my first two posts---> Part 1 & Part 2

Remember, all the PABD supplies can be bought from the online store here

Hope you have a pleasant week ahead. 

Thanks a lot for your precious time :) 
Stay Blessed!

Thursday, October 5, 2017

Crafting with Preeti D.

Hello Dear Crafty Friends !

This is Preeti Datta (aka Dutt Preety) here. How are you this fine morning?

We have had loads of eventful and exciting news at Peek-a-boo Designs over the past few days including:


-our New October release of stamps, dies, stencils & washi tapes 
(for more info, you can click here & here)

- Crafty Challenges that give you a chance to win more PABD goodies! 
(to get more info, you can click here & here)

Today, I’d like to share with you a couple of projects.

1. CAS Diwali Card


This is a Clean & Simple A2 sized, top folding card.

Process:

- Die cut white cardstock using the stitched scalloped rectangle die. Then colored the scalloped frame with Fossilized Amber & Spiced Marmalade Distress Oxides

- On the card base, masked off the edges and applied distress oxides through the Dimensional Stencil

- Stamped the beautiful fish from the new Madhubani Stamp on Canson Watercolor paper & colored it in with zig markers, then fussy cut it.

- Stamped the sentiment from the Diwali Greetings Stamp set onto a strip of watercolor paper & then colored in the strip with zigs and an aqua brush.

- To assemble the card, adhered the frame at a tilted angle onto the cardbase, also adhered the sentiment strip within the frame and then foam mounted the fish in the center, to add texture added a few gold strings under the fish to make it pop.

- In the end, adhered a few gold colored sequins for some sparkle


2. Mixed Media Layout- Beauty in Simplicity
(Challenge Inspiration)


These are some close-up photos of the layout:


I wanted to depict the beauty in simple things and the delicate image of a girl smelling the scent of pretty flowers really spoke to me, so I decided to create a Mixed Media Layout around it.

Process:

- Prepared the white cardstock base (12 by 12 inches) by applying white gesso

- Added strips of the pretty new washi tape-Blue Blossom onto the background to create a pattern and then applied a wash of white gesso over it so that I could do watercoloring over the top in some areas

- Stamped on the pretty flowers from the Floral Fantasy Stamp in the background using black archival ink (since it is a permanent ink that that doesn’t run when dry- I knew I wanted to do watercoloring later)

- Used the Dimensional stencil and added some background stenciling with black archival ink

- Stamped flowers from the gorgeous new Pretty Roses Stamp set & colored them in with watercolors, then fussy cut the images

- Die cut leaves in black & white using the Dual Leaf die & die cut the lattice using the Graceful Lattice Die

- Did watercoloring in the background (with a blue, yellow & green) and also colored some gauze

- Adhered the photo to some blue pattern paper and stuck the frame from the Scalloped Rectangle die on the photo to make the image pop

- To assemble the layout, I created layers using the fussy cut images, die cuts, pretty & delicate lace, flowers, gauze & a metal embellishment (which was colored with inka gold)

- In the end, added a few sticker sentiments, a few gems for some sparkle and created a little blue & white splatter

Would love to see your submissions for the October Challenge, to participate, please click here

That's all for today :)

Remember you can always buy all the PABD supplies from the PABD store here.
And please do share your wonderful artwork using PABD supplies, with us, in our facebook group here.

PABD Supplies used:


Thanks a lot for your precious time :)
Stay Blessed & Happy Crafting!!