Tuesday, May 17, 2016

'Away we Go' : Bookmarks and a spiral pop up card!

Hello Everyone!!!

I'm sure you all must be enjoying the fabulous creations by our DT members and there have been some really cool summer themed projects doing rounds here at the Peek-a-Boo blog!! Blame it on the super cute MAY 2016 release!! This one release has something for everyone and makes way for very pretty stamp sets to be added to your stamp treasure!!
PABD also houses the Exclusive stamp Set, where a stamp set can be purchased via the month's exclusive stamp set. Check the complete scheme at the PABD blog and the FB pages!
I'm working with the Exclusive set for this month which is a Travel Theme based stamp set and is named 'Away We Go' !! This stamp set is very versatile and has some really nice travel related stamp sets!

Here's what I made with the stamp set.

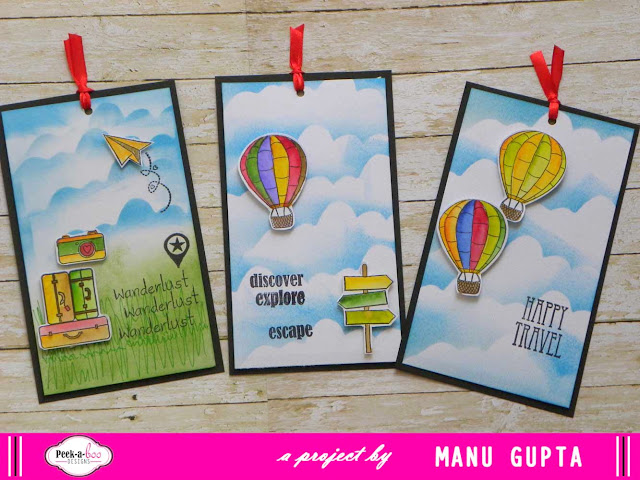
I made a set of 3 colourful bookmarks along with a spiral pop up card

Both the creations have minimal embellishments and the focus is mainly on the travel related stamps that are there in the stamp set. 

This is how the spiral pop up card opens like
The card has an interesting opening and this one is really simple to make. All you need is a square piece of paper and then you simply cut it out like a rolled rose. adhere the innermost point and the outer most point with the below and upper flap of the card respectively and watch the super cute way the card opens up! Adhere the stamp cutouts on the spiral of the card!


Here's a look at the bookmarks!

These are very simple and easy peasy too!! I loved the Hot Air balloon and decided to use that stamp as the focal. These balloons are stamped and then coloured with Nirmal watercolors, which are kind of the indian version of the peerless watercolors!! Super economical and the best thing is the no-hustle way of carrying it around!


The base of the bookmarks is made with masking the clouds shape with distressing. I handcut the clouds shape onto a piece of paper and then used that as a base to make the background moving from bottom to top and making the sky background. 
Onto that is then adhered the fussy cut, coloured images of the stamps from the set.
The right hand one was done with the masking started halfway and the bottom was sponged with the green distress ink and the grass is hand drawn !


and these are then finished off by stamping the sentiments onto the boomarks!!

Here's the Travel theme stamp set!


Perfect bookmarks for a travel addict! I totally loved making these bookmarks and the card and loved the way these came out to be the colourful ones!!

I hope you liked them as well and do not forget to enter into our current challenge which is all about inpiring yourself!
Read the deets here.

Happy Crafting!
Manu


Friday, May 13, 2016

Its Summer Time @ Peek a Tute

Hello Everyone, hope everyone is beating the heat and coping with the scorchy sun :).

Anyways its quite a season up here in north and its the perfect time for a cool summer project.

Today at Peek - a- Tute I bring you a card which you can use to tell a story with many sentiments. Its nothing unique that I made or invented as most of you must have seen it on various craft sites.

However still I am trying to simplify the way the card is made.

So its called a Tri - shutter - Card and the reason I like this card always because of the immense space it gives to express what you want to say yet the compact size being the standard 5.5x4.25.


1. Take a 51/2" X 12" any color CS for the card base. Chose the stamp set and basic supplies.

2. Keep the CS horizontal on the scoring board and score at 2",4",8" and 10".

3. Align the CS vertical at 11/2"  and cut from 2" to 10". Slide at 4" and cut at the same scores.

4. It has a total of 11 panels and I have numbered it so that its easier for the embellishments and size.

** Below is the measure for each of the 11 panels. Cut the other CS at 1/8" less than the base CS.


4 & 5 : Depicts the Panels.

P1 : 2 X 51/2"
  P2  :21/2" X 2"
P3: 11/2" X 2"
P4: 11/2" X 2"
P5: 4" X 11/2"
P6: 4" X 21/2"
P7: 11/2" X 4"
P8: 2" X 11/2"
P9 : 2" X 21/2"
 P10: 2" X 11/2"
P11: 2 X 51/2"

Above are the panels and how I have decorated and embellished each of the panels.  All the panels base CS is colored using distress ink and given a background with the smallest element in the stamp set.

And the finally the card look like this :). I have chosen some summer colors if you may notice to sprinkle some additional touch.


Some close up shots so that you can view the panel designing in detail.


The Fresh and Cool is a 3D sticker I bought 4 years back from Itsy Bitsy...:):):)

Thats all I have. Hope this will help you all to make one for yourself. 

Oh yeah, please  come along and play the challenge for us. Its a interesting one this time and also dont forget to see our "Design Team Call"


Wednesday, May 11, 2016

MONSTROUS Creations !

Hello Friends 

Sharada Dilip here , I am sharing creations with our MONSTROUS Stamp Set Today


The cute little monsters stole my heart instantly , My son was jumping with joy as he said they were something he would love to receive !


He suggested a Card , a gift Tag and some Book marks !! 

Isnt that an-awesome set ....what a kid would love receiving??


For the Card we decided a theme where my son wanted them to be exploring the sky !

I have stamped the monsters as a  background, unevenly as the monsters or aliens as he says float in the blue sky ! 
The rocket is stamped and fussy cut and colored with water color pens 
The silver punched stars are added to complete the Birthday card 


The Gift tag matches the card with similar elements but this little fellow had googly eyes and he's all set to come to the party  !


Finally the Book Marks that we wanted was more of fun ! 

The water colour paper is layered with gesso and then we colured it with water colour crayons 
It was fun mixing colours and getting this kind of back ground !

The monsters are stamped and watercoloured then  fussy cut and adhered along with line we wanted on the book mark !! 

Book-a-sur is a totally Indian Book mark :P, Book monster and eye think of you always are soo adorable !!

Here is the stampset used 


I hope to have inspired you,  Do remember to link up your entries for this month's challenge!
I love to hear from you & truly appreciate your feedback. 

Happy Crafting!


Monday, May 9, 2016

Focus Post - Summer Cooler Stamp !

Hi friends ...this is Vijaylaxmi & its my turn today to share some cards focusing just one stamp set - Summer Cooler Stamp.


So lets check what i created today -

First Card - 


Steps On Making this - 

1) Took a White CS n then using broken china , mustard seed & carved pumpkin Distress  inks ..distressed the whole background.
2) Took a scrap piece of card stock and again distressed it wih first mustard seed, antique linen n finally vintage photo for sand like look on a beach.Then roughly tore the scraps for more texture .
3) Stamped & colored the flip-flops, sunnies & shells From Summer Cooler Stamp Set & cute sun from Chirping away Stamp set  on white CS & fussy cut all !!
4) Arrange all on the Card and stamped the sentiment again from  Summer Cooler Stamp set ..loved the perfect match of sentiment with the flip flops :)
5) Yay..its done..simple !!

SecondCard 


Steps On Making this - 

1) For this card I firstly stamped the biggest circle from our Latest released Solid Shapes Stamp set  on a White CS  using different colored pigment inks to create my background.
2) Stamped & Colored the Lemonade Glass & Lemon wedges & Fussy cut all.
3) Put all on a aqua colored card stock strip  which is layered with a silver glitter strip & Vellum sheet. 
4) Stamped the Sentiment from Summer Cooler Stamp set and tiny stars to add extra touch.
5) I just loved the softness of this card ..!! Done :)

Third Card 


Steps On Making this - 

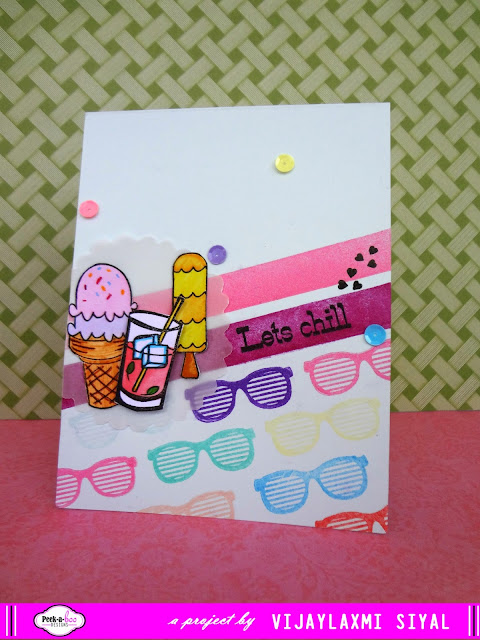
1) To create this card I firstly stamped the sunnies in different shades of pigment inks on a White CS n then using  Its Plaid Time Stamp stamped two solid stripes in same diagonal pattern.
2) Stamped the Yummy ice Cream Cone , juicy ice candy & lemonade glass and colored them using Faber castel connector pens ( I used these pens for all coloring and loved them totally ). Now cut all.
3) Put all on a wood vellum scalloped circle.
4) Stamped the Sentiment "Lets Chill " from the same  Summer Cooler Stamp set to match all the elements perfectly.
5) Finally added some sequins to finish my card and we are done ;)

Fourth Card - 


Steps On Making this - 

1) For this card I stamped the Ice Sticks & colored them using same pens on a White CS.
2) Placed a vellum sheet over this and stick the ice cream cup over it .
3) Stamped the Sentiment "scoop of thanks" from the same  Summer Cooler Stamp set to match all the elements perfectly.
5) Finally added some sequins to finish my card and we are done ;)


Other Stamps from peek-a boo Designs used are --


I Hope you enjoyed this post of today !! Check out this month's challenge to enter and win ...and for fun for sure 😜

Hugs ...
Vijaylaxmi Siyal (Shalu)


Challenge # 5 : Winners

EChallenge#5  Winners

Hi every one..


We are back with the results of our previous challenge !! We are getting super awesome response for our challenges & would like to thank all of you for your continuous support !!

So lets get back to our winners !! 
Winner - Zalak

Runner up - Sini 


Runner up - Ria


Congraratulations to all the winners .. please take the winner badge for your blog from http://peek-a-boodesigns.blogspot.in/p/peek-boo-designs-challenge.html
and write to us at thepeekaboodesigns@gmail.com to claim your prize !!

Love
Vijaylaxmi

Friday, May 6, 2016

Peek-A-Tute : Monstrous Desktop Calendar!!

Hello Everyone!

I hope you must have all loved the MAY 2016 Peek-A-Boo Designs release. This is a real treat to eyes and I'm sure everyone would be having their own favorites from this release!!!

We have a new challenge, well that's kind of a ritual with the beginning of a new month, right!! this time the challenge is all about drawing inspirations from the DT's. Find everything about the challenge here

Do remember to read the guidelines carefully for participating in this months challenge! 
Now for the new release, well, like I mentioned before that this month's release offers a whole lot of varieties for each and everyone!!! This month has travel, super awesome sentiments, monsters, summer cooler, mango and soo much of fun with the stamps!!!

I have a tutorial here today!! I totally loved the MONSTROUS stamp set and literally had to snatch away this stamp set from being used by my fellow DT's. I really really really wanted to work with this set and somehow, I managed to register this set against my name for this month!! now once this was done, since I'm really smitten by these cute yumm creatures (now who says monster's as yumm -- that's me) I really had to think hard as to how to make a good use of this stamp set, and then I stumbled upon the idea of making a calendar with this stamp set. Who would not love to have a monstrous calendar!!! 
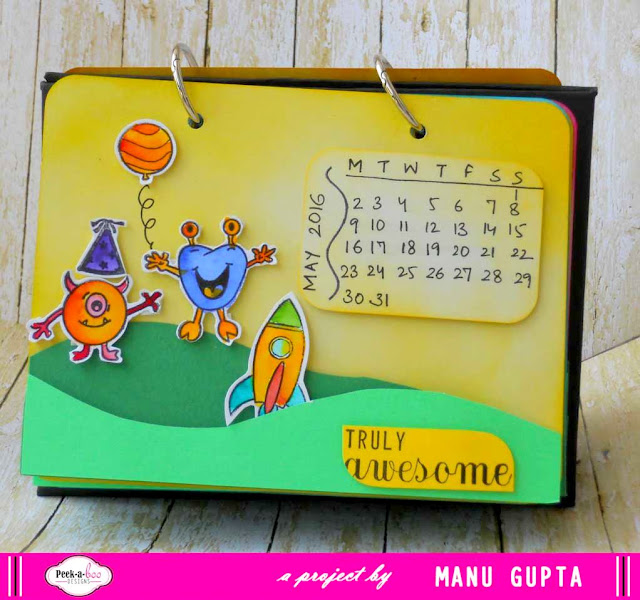
Here's what I made!


Here's the stamp set I used to make this calendar 
This set is designed by one of our very own DT Vijaylaxmi Siyal and I'm totally in awe of these itty bitty cuties! 

Sit back, relax coz I have a tutorial on how I made this calendar
1. Take cardstock panels measuring 6.5*5 inches. I took 12 to make for a month each, but then later I decided to ditch half and make use of 6 panels for 12 months. 
I distressed each panel with a few of my favorite distress inks! That Fossilized Amber is the newest one in my collection and I totally love this cool color!


2. Once the panels were distressed, I opted for grass like appearance on the panels and cutted out some green colored cardstock in two different shades to give some depth! These are then given a free hand shape and are then struck to the panel with some double sided tape to give dimension.


3.  Here comes my most favorite part. I stamped the monster images onto a cardstock and then coloured them using the Nirmal watercolors(These were sent over by another Dear Friend, Tejal and yes, I totally love these colors, these are much like the peerless watercolors and are very smooth and rich to work with ) Once done and dried, these are then fussy cut! Here's a little monster party!

4. A major portion of the calender is complete!! Now I made a little holder for the same.
I took cardboard and cutted it out in a little bigger size than my panels.


Here's how I'm ,making the base to which the panels will be attached together. 

Stick in properly with the tacky tape and make incision points at the edged of the cardboard pieces. ! Now you can make the two ends meet and mark the openings for the binder rings to slide in!


So this makes the base for the panels!
Here's my completed calendar!


I'm so in love with this cute little monster calendar!! Ohh yes, I did use the sentiments from another of the May 2016 release!

These word cluster stamp sets are very much versatile and I have made all my sentiments using the same stamp set! 

Here are a couple of more monster pics!
I had a super duper time making these little creatures!!!


I hope you liked the calender! Do remember to link up your entries for this month's challenge !

Happy Crafting!
Manu


Wednesday, May 4, 2016

You mean the world to me !
Hello Everyone, hope you are having fun playing with our challenge for this month.

You can find the challenge details here.

And now its my turn to inspire you and show you some ways how to use one of the most adorable set for this month.


For both the cards I have used the "Roundy Sentiments" which is a brand new release for this month.

I took advantage of the set and used round and scallop shape dies to create my cards.

The best thing about this set is it co ordinates with you generic round dies so that it gets easier to create your projects incase you want to use them in circle shaped cards or tags.


Sunday, May 1, 2016

Challenge 6 # Inspire Yourself !!

 Hello Lovely Crafters!! Welcome to the blog with new challenge and some awesome prizes to win AND most importantly a brand new release and loads of inspirations!!

        We are so overwhelmed with your fantastic response for our previous Challenge # 5 !! All entries are so so beautiful & gorgeous that its gonna tough time for us to pick the winners from all of you guys..but we loved all the entries & off course love you all so we would like to see you again & again  with your wonderful entries..!!

We have a lovely challenge for this month.. All our DTs had real fun creating each element in their projects so that all off them could be different from each other and you guys could have a huge range of choices !!


Here is what this challenge is all about :

All our 5 DTs have completely different themes and elements in their projects.. You need to be inspired by any one of the projects and use any THREE (3) element from any one of their projects and make your entry for the challenge!!

 ** Additional Rules for this Challenge **

Use atleast THREE elements from any ONE of the DTs project and make your entry project and mention in you entry which element have you picked.

For inspiration our DT members have made a project each be sure to pick elements from just one project to qualify.

Here is a glimpse of the projects. You could click on their entry picture to check all the details of their project on their Blog.

HALAK SHAH


A classic CAS birthday card using the Solid Shapes stamp set for background. Elements used : Brads, Sequins, Die-cut (Sentiment is a Die-cut), Glitter, Washi Tape, Paper Tape and Pastel Colors.

MANU GUPTA


A Super cool summer cooler card with mainly ice cream elements from the 'Summer Cooler' stamp set. Have used, Stamps, masking technique, vellum, heat embossing, confetti, sequins etc!


A CAS Card with the smartest sentiment set of the month. Used Button, partial die cut, blings , Pattern paper , co coordinating CS and Fabric washi tape to embellish the card.


I have a fun travel layout on a Polka Dot pattern paper with loads of tags and embellishments and loads of stamping of course. Used twines, washi tapes, buttons, and loads more .. 


A fun Monster Card with Galaxy Background Using Distress Inking, Water Bleaching Technique, Paper Piecing / Fuzzy Cutting, Heat Embossing, Stamping, Coloring , birthday Celebration as elements to complete the card !!


Stamp Set used in this post  from our new collection are as follows!!


Other stamps from our MAY release :


You can purchase these from www.thepeekaboodesigns.com.

 General Rules : 
  1. Be a follower of our blog
  2. Create a new project for the challenge. No back links please. Altered art, ATCs, cards, scrapbook pages, or any other craft projects are acceptable as long as they adhere to the month’s challenge. You may enter as many projects as you like.
  3. USING STAMP IS A MUST
  4. Please link to the exact post on your blog - not the home page URL of your blog - using the inlinkz icon at the bottom of the challenge.
  5. You MUST mention our blog in your post AND link back to our blog or your entry will not be counted.
  6. If you do not have a blog you can enter our challenges by tagging us on facebook and instagram with "#PABDchallenges". If you do not tag us we do not see your entry.
  7. You may enter a card, a page layout, an altered item, a mixed media item, a mini album.. anything that fits the challenge, unless the challenge states that a specific type of project must be created. Please , no 100% digital projects. A part of the project can be digital.
  8. No restriction on the number of challenges you can take part in - As long as your project matches our challenge, you may "pile on" the other challenges to your heart's content.
  9. We will accept a maximum of three entries per person. Please add -2 and -3 next to your name for subsequent entries.
  10. A Winner will be chosen on their merits. So submit your most creative projects. And that's all there is to it! International Crafters are welcome to participate in our challenges but their prizes would only be sent to an Indian address due to high shipping cost
Hope  you like our fun challenge and our new release !!


Love
Vidushi !!