Showing posts with label DT. Show all posts

Saturday, January 20, 2018

Mix of creativity with Ruchi's Crafeteria!

Hey there!!
This is Ruchi from Ruchi's Crafeteria..! 
I'm back again and today sharing an article about some Greeting Cards and Tags using Peek-a-boo Designs January Release products. You can find all the new release HERE

Here are my projects...

Card 1- 'Sending Lots of Love'


 Procedure:
For this card I've used PABD- Lily Thought stamp set. Stamped these beautiful lilies on watercolor paper using embossing ink and heat embossed them in white. Then water colored  them using Zig Markers. Sentiment is from PABD- Veined Daisy stamp set. Added sequins here n there to finish my card.

Card 2- 'I Thought of You Today'


Procedure:
For this card I've chosen brown Cardstock and created this background using my designed PABD- Damask Delight Stencil along with white ink. After creating my BG, I've stamped these flowers on a white cardstock using PABD- Lily Thought stamp set. colored them using my Fabecastell Watercolor Pencils and fussy cut it. Sentiment is from same stamp set only and arranged & adhered all of them on my card base. Added sequins and glitter for finishing touch.

Card 3- 'Love'


Procedure:
For this card I've used PABD- Polaroid Die to create this black frame. First I've created my card background using PABD- Square and Ractas stencil using green ink. Then adhered this black frame on that. This cute panda image is from PABD- Panda Hugs stamp set. stamped it using black ink and balloons colored using my color pencils. Fussy cut and glued it on the frame. For sentiment used gray piece of cardstock and stamped love in green from PABD- Succulent stamp. That's it! :)

Tags/ Bookmarks- 'Succulent'


Procedure:
For these tags I've used PABD- Dual Stitched Triangles die and the other rectangle shape tag it the inside die cut part of that PABD- Polaroid die. Created the BG using PABD- Succulent stamp set using shades of green inks. These beautiful flower pots and plants are stamped from same stamp set only. I've used masking technique for creating these pots with plants. Coloring done using my Fabercastell Pencils.

Here is a closeup of these tags..


Hope you like my crafty project today and don't forget to participate in our current challenge 'Anything Goes'


Supplied used..
Damask Delight Stencil


Square and Rectas Stencil


You can shop all the products HERE 

Thanks for stopping by! :)
Happy Crafting!

Ruchi..

Saturday, September 24, 2016

Create Backgrounds using Die - Cutting Inlay Technique (two variations)

Hello Crafty Friends,

Welcome back to my post, today I'm sharing a fun video where I just use one die to create a very glittery background for my cards..
Its a very simple technique of die-cut inlaying, where you die cut your base panels with some die. And use some other cardstock to die cut few out of the same die. And then use this die cut pieces as puzzle pieces to fit into the base panel(already die cut).


I know this sounds really really confusing, but trust me, its easy as it could be. So I have a video tutorial for you guys to show you this fun easy and awesome looking technique..


I also share a variation in my video where you can use either vellum or cardstock behind your panels to get different looks from the same technique..


So without much ado let me share the video with you guys..


And if you wanna watch the video on YouTube click HERE

Here is a picture of both the cards together.. Aren't they pretty? Oh I love all that glitter.. Could not decide, which ones my favorite.. Can you??


All the supplies used here are listed in the description box of the YouTube Video.
Hope you guys enjoyed it.
Thank you for visiting. 
Have a Nice day.

Regards 
Neha Tulsyan

Sunday, September 18, 2016

September Release 2016

Hello crafty friends,

Welcome to my first ever post on Peek-a-Boo Designs Blog.
As you guys know I have been chosen as a DT member here, I share with you guys my first video, where I feature the September 2016 Release of Peek-a-Boo Designs.

In this video I feature few of this month's release, show you how precisely the dies cut and also show a card for which I will share tutorial in my future videos here.
I also share the colored image of Renee - Diwali stamp set, which I colored using Copic Markers.

So without taking much of your time let me share the video


To watch on YouTube click Here

Details of all the products featured on this video are in the description box of the YouTube Channel.
Also you can find the products Here..

Thank you for visiting. See you until next time.


Keep crafting
Neha Tulsyan..


Sunday, August 14, 2016

CAS Sunday with Nadiya Bilovodenko

Hi crafty friend! Happy Sunday to everyone!!! Hope you have fun today )))) Ok))) Nadiya Bilovodenko is at the PABD blog today wiht you. I have some CAS cards. They are simly and beautiful.
The first card for today:
 Halftones muted ..... ..... and some mysterious ...
 Miraculous inscriptions were the impetus.
 Heart Jewellery handmade. I made for you a quick tutorial.
The second a project is a card too.
 Oh, and I liked the  bubbles  stencil )))
 And the last a project for today:
 
Truly a true an inscription ...
 Close up...

I propose a quick step by step tutorial.

1. Take a set of stamps. We need hearts.
 2. Gray in ink stamps do the. Add glossy. Sprinkle the glitter. 
3. After drying simply cut the heart.
4. With distress ink and stencil  bubbles make the background.
5. Add the major inscriptions.

Your CAS projects are ready. Enjoy your creativity with PABD!


In my projects I have used:

Bubbles stencil 
Solid Shapes
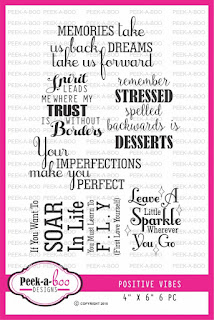
Positive Vibes
Magical Fairies


Saturday, August 6, 2016

Colour inspiration challenge # 9 with Daksha

Hello! crafty friends
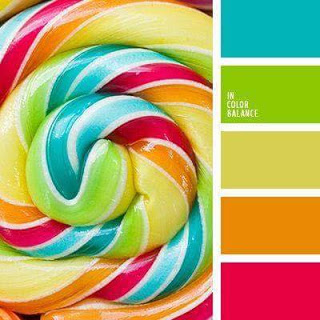
  Today its me Daksha Popat at Peek-a-boo Designs blog with my inspiration for Challenge #9 - colour inspiration...,you can choose any three colours from there and do your project..For prevoius inspirational project from our fellow DT's you can see HERE


I have two project to share...

Here is my 1st project using ink smooshing technique...


Its a  5'' * 7'' card . I took rangers water colour paper and using ink smooshing technique I have  prepared my background. Then misted with Perfect pearl mister to get that shiny pearly effect. Then stamped the butterflies on a smooth card stock using Black Archival ink,fussy cut them ,applied glossy accent and glitter rock candy.Placing all the butterflies roughly , I stamped the sentiment using MISTI tool . I stamped twice to get proper dark sentiment. Then did the layering using dark red card stock. Finally arranged all the butterflies and stuck with glossy accent

My second project using all five colours from colour inspiration board


This card is a single layer card..For the card base I took Iris paper which I distressed with peeled paint in the center ,then misted with water to get that beautiful water droplet effect.I stamped that ice candy on water colour paper with black Archival ink, then coloured the images using zig real brush  pens , fussy cut them ,used glossy accent and glitter rock candy ....arranged on my card center and directly glued...Finally stamped the sentiment and gave boarder lines using black marker

Hope you like my projects for today ...Waiting to see your work for this month challenge
Thank you 
Love n Hugs
                                                                            DAKSHA

Supplies used


Friday, August 5, 2016

Color insperations and tutorial by Nadiya Bilovodenko

Hi PABD fans! Today me Nadiya Bilovodenko is here on the fabulous Peek-a-boo Designs  blog with my inspirations for  #9 Color challenge. The wide palette makes it possible to create miŃ…ed media projects and I made a tag. Hop on along with me to see what I have made.


 My tag is large. And I played with stamps and stencils.


 And some close up:


And now my master class:

1. Get your tag, stamps, watercolor paints, stencils.


2. In random order, apply watercolor paint on the tag. Once dry apply the stamps.


3. Put distress ink through a stencil.


 4. Apply any medium of your choice through some other stencil.


5. Cut the stamped mandala.


 6. Assemble the composition. Apply randomly stamps. Add splashes of white and black gesso.
 

Thank you for staying along with me !!


 Do hop one to our new Challenge #9 Color


In my projects I have used:
Arrow stencil 
Bold Butterflies
Bubbles stencil
Mandala
 Positive Vibes