Showing posts with label Gift tags. Show all posts

Saturday, January 20, 2018

Mix of creativity with Ruchi's Crafeteria!

Hey there!!
This is Ruchi from Ruchi's Crafeteria..! 
I'm back again and today sharing an article about some Greeting Cards and Tags using Peek-a-boo Designs January Release products. You can find all the new release HERE

Here are my projects...

Card 1- 'Sending Lots of Love'


 Procedure:
For this card I've used PABD- Lily Thought stamp set. Stamped these beautiful lilies on watercolor paper using embossing ink and heat embossed them in white. Then water colored  them using Zig Markers. Sentiment is from PABD- Veined Daisy stamp set. Added sequins here n there to finish my card.

Card 2- 'I Thought of You Today'


Procedure:
For this card I've chosen brown Cardstock and created this background using my designed PABD- Damask Delight Stencil along with white ink. After creating my BG, I've stamped these flowers on a white cardstock using PABD- Lily Thought stamp set. colored them using my Fabecastell Watercolor Pencils and fussy cut it. Sentiment is from same stamp set only and arranged & adhered all of them on my card base. Added sequins and glitter for finishing touch.

Card 3- 'Love'


Procedure:
For this card I've used PABD- Polaroid Die to create this black frame. First I've created my card background using PABD- Square and Ractas stencil using green ink. Then adhered this black frame on that. This cute panda image is from PABD- Panda Hugs stamp set. stamped it using black ink and balloons colored using my color pencils. Fussy cut and glued it on the frame. For sentiment used gray piece of cardstock and stamped love in green from PABD- Succulent stamp. That's it! :)

Tags/ Bookmarks- 'Succulent'


Procedure:
For these tags I've used PABD- Dual Stitched Triangles die and the other rectangle shape tag it the inside die cut part of that PABD- Polaroid die. Created the BG using PABD- Succulent stamp set using shades of green inks. These beautiful flower pots and plants are stamped from same stamp set only. I've used masking technique for creating these pots with plants. Coloring done using my Fabercastell Pencils.

Here is a closeup of these tags..


Hope you like my crafty project today and don't forget to participate in our current challenge 'Anything Goes'


Supplied used..
Damask Delight Stencil


Square and Rectas Stencil


You can shop all the products HERE 

Thanks for stopping by! :)
Happy Crafting!

Ruchi..

Saturday, December 16, 2017

Ruchi's Crafeteria-Tutorial - Note Cards with Card Holder!


Hey There..!
This is Ruchi from Ruchi's Crafeteria..! 
Today I'm sharing an article about some Note Cards with a Card Holder which I've created using PABD ( Peek-a-Boo Designs ) new release. You can check all the new products HERE & HERE

Here is the pic of my project...


Christmas is all around so I chose some Christmas colors for my project. I have step by step procedure and one fun video too. But before that enjoy all the pics..


This cute green button is from my stash and that maroon circle behind the button has created using Circle Die form PABD. 


These Note Cards are 3"x3" in size. Used CS, PPs, embellishments, washi tape n many more materials for creating them. :) 
Here are individual pic of all three note cards..


I've used PABD- Colorful Polka washi tape in the first note card and sentiment is from PABD- Veined Daisy stamp set. In the second green card, created my own background using big n small leaves from PABD- Pretty Roses stamp set along with Memento inks. Sentiment is from same stamp set and heat embossed in white. In the third card used pattern paper and added this sequin flower. Sentiment is heat embossed in gold n again from PABD- Pretty Roses stamp set.

A close up pic of this flower which is from PABD- Pretty Roses stamp set. Colored it using Altenew Markers and added that shine using Wink of Stella. 


And now it's tutorial time! Here are the pics of all step by step procedure. I'm explaining all the steps too with every pic..

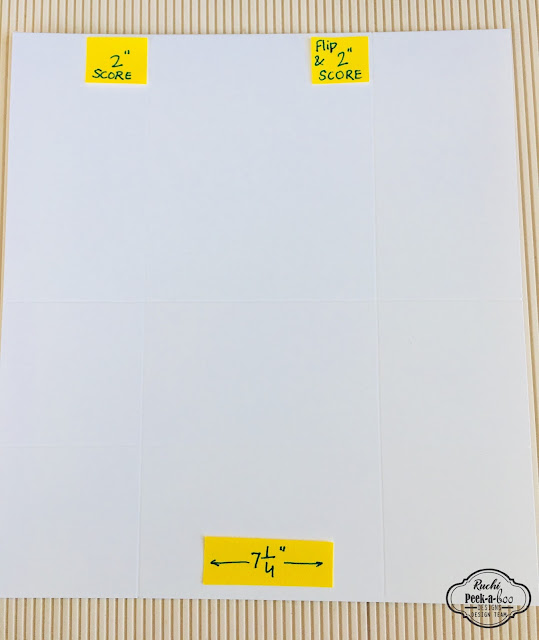
Step 1- Take a cardstock measuring  8"x7-1/4" I've chosen Neenah Bright White cardstock.


Step 2- Score at 2" n 4" using your score board at the length of 8"


 Step 3- Score at 2" at the length of 7-1/4" and flip the Cardstock and again score at 2"

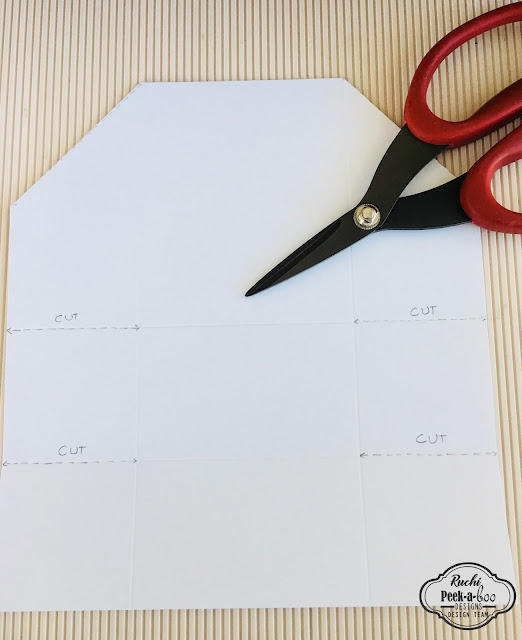
 Step 4- Now make a mark at 2" on the top of the cardstock both the sides and make mark diagonally.


Step 5- Cut those mark lines and make 2" mark on the both side of your score lines horizontally. You have to make total 4 marks and cut it out.


 Step 6- Look at the pic. It's all about the mesurements for decorating your Card Holder. First 2 pieces are for sides. Third piece measuring 1-3/4"x3" is for yor card holder base and the last big piece is for  inside decoration.

Step 7- Take your choice of Cardstock measuring 3"x3" for your Note Cards and PPs are in 2-3/4" x 2-3/4" in size.

Now enjoy the video which is all about craeting and assembling this project. You can check the video HERE

                         Here are all the PABD Products which I've used creating my projects..


You can shop all the products HERE
Our current challenge is going on. Theme is 'Anything but Card'. You can find more details about challenge HERE
Hope you like my crafty work today. I'll come up with more fun projects soon. Thanks for stopping by! 
Happy Crafting!
Ruchi..


Saturday, December 9, 2017

Crafty Inspiration With Ruchi's Crafeteria!!

Hey there! This is Ruchi from Ruchi's Crafeteria..! Today is my first post here as DT. I'm super excited and so happy to join PABD team. 
Today I'm sharing some crafty projects which I've created using PABD new release. You can check all the new products HERE & HERE

Here is my first project. I've created a bookmark....


I've used 'Bookworms' stamp set for creating this Bookmark. I stamped the image on watercolor paper and colored using Zig Markers. Sentiment is also from this stamp set only.

Here is my second project...Gift Tags...


I've created these cute tags using 'Dome Tower' Die set. These cute animals are from 'Vet Me' stamp set. Stamped them on watercolor paper n colored using Zig markers then fussy cut them. Just use a stripe of these Colorful Polka n Watercolor Flowers Washi Tape which you can find in October Release ..Sentiments are from 'Floral Cages' and 'Pretty Roses' stamp set which are also from October Release. The top tiny circle is from 'Dual Stitched Circle' die set. You can see all these products pics at the end of this post. :)

Here is my third project... again some Gift Tags!


Used 'Floral Cages' stamp set for creating these tags. I've Stamped these beautiful images on a black CS with embossing ink and used gold n silver embossing powders to heat embossed them. Colored those tiny flowers n leaves with color pencils and gave a finishing touch with white gel pen.

And now here is my final project for today. Created a greeting card...


For this card first I stamped these flowers from 'Pretty Roses' stamp set and colored them using color pencils. Then fussy cut them. This big stitched circle is from 'Duel Stitched Circle' die set. die cut this circle on a pattern paper and distress the edges using Memento- Pear Tart ink. At the bottom used Monochrome Beauty washi tape n colored here n there with my gel pens. The above right corner pattern has created using 'Blotchy' stamp set.  Arranged and adhered all these on my card base. Sentiment is also heat embossed. 

Here are all the PABD products which I've used creating my projects..


You can shop all the products HERE 
Our current challenge is going on. Theme is 'Anything but Card'. You can find more details about challenge HERE
Hope you like my crafty work today. I'll come up with more fun projects soon. Thanks for stopping by! 
Happy Crafting!
Ruchi..

Wednesday, May 25, 2016

Guest Designer Post with Monstrous Set- Ria Banerjee

Hello Crafty Friends,

This is Ria Banerjee again here on the second part of the Guest designing post for this month and I blog at rbartfx.blogspot.in I am really thankful to everyone who left such wonderful and inspirational comments to boost me up :) I hope you will be liking my second post for this month as I didn’t want to make one post too long :P

Thanks Vidushi again for this opportunity :) ^_^


With the Flower in a Jar set, I also received Montrous set from Vidushi. The set stole everyone’s heart right from the first day of its release with its super cute creatures. I must admit to the fact that this set and the projects not only made the kids happier but also us! What say?


After playing with this stamp set for a longer time, I finally got some idea to work on these cutie monsters. I have made four projects in total and here it goes:


FIRST PROJECT:

The first thought that I got seeing the set is the starry night. So, I tried to depict one. I took one water color paper and colored it blue of different shades with transparent water color folios. I can also be tried with the distress inks. Then I sprayed some drops of texture white mixed with water and also stamped and smudged some stars to give it a look of shooting star. I stamped the rocket and a monster from the set separately, colored them, fussy cut them and pasted them on the card stock with a 3D tape.  I made the moon with some silver glitter, Finished the bottom side with tapes, glitter sheet and the sentiment embossed with white.
Here is the final look…


SECOND PROJECT:

The second project is also one card with these monsters. I stamped and embossed some stars on a black cardstock and added pearl finished papers for the grounds at the bottom. I stamped the monsters and the rocket separately, colored and fussy cut them. I added them to the card stock with a 3D tape. I added the sentiment at the bottom and embossed it with black. Lastly some foam glitters on the borders.


THIRD PROJECT:

My third project is a CAS card.  I stamped this funny monsters separately and only the face of the monster separately and have drawn a heart around it (I loved the expression of joy on its face), colored them, fussy cut and pasted on a water color paper. Meanwhile I first embossed the mini hearts and stars to it and added colors to it on a random basis and let it spread on its own. Isn’t it looking beautiful the effect!
And the sentiment, I placed it in a single line and the sentiment goes perfectly with the expression ^_^


FOURTH PROJECT:

My last project is the cute and small tags. I thought these tiny, cute monsters go best with these. I took some scrap papers and blended some ink on it through a stencil. Stamped each monster on each tag and colored it. I really loved the fact that these monsters actually give you the liberty to color with no limitation. Isn’t it?
Finished with the different sentiments on each tag and some bakery twines! And here it goes:


I hope you liked all the projects with these super cute monsters.

Happy crafting with this set :) and lets say ZOOMMM! 

Love and Hugs

Ria