Showing posts with label distress inks. Show all posts

Wednesday, November 30, 2016

2 cards with Distressed background - Swapna

Hi.. Friends..
Its been a long time i posted here. I have 2 cards for you today. I wanted to make a shaker card from past few days. So i have one shaker card.

Card #1

* The panel I used for both cards is same.
* I gold heat embossed the floral bloom image on a white CS and applied distress inks.
* I die cut the panel with stitched scallop rectangle  dies (used both on same panel).
* Glued frames together and used doubled foam tape to create my shaker well.
* Heat embossed sentiment from Birdie stamp set.
* Used different coloured sequins and secured the frame on card base.

Here is the card


Closer look at sentiment and sparkling sequins


Card #2

This was very easy to put together as most elements were ready.

* I used remainders of frame for this card.
* I glued both pieces on an acetate.
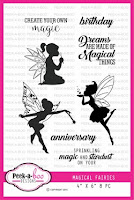
* Heat embossed image and sentiment from magical fairies on vellum.
* Glued the vellum on the panel and the whole panel was mounted on card base with foam tape.

** Only reason to use acetate was to avoid cutting thin strips of foam tape.

Here is my card


Here is the closer look at the panel and sentiment.


Supplies


 Hope you liked them..

See you soon..

Suggestions are always appreciated..


Friday, November 11, 2016

CHALLENGE #12 - COLOR INSPIRATION By Bilovodenko Nadiya

Hi PABD fun's))) Today Nadiya Bilovodenko is here.Our's Challenge 12 is so incredibly inspiring!!!
I did a series of three cards. 

Let's take a closer look.
The first project

 Technique hot embossing white powder and  background with distress ink.
 The set Feather simply magical

The second project - the card.
 Simple background - I did distress ink and water. Feathers I made hot embosing and distress, and then I cut them.
 I wanted lightness and weightlessness......
 The third project.
 I think the magic around us is ....... enough to pick up a set of stamps amazing ...

 And all three projects together.
 I hope you enjoyed my inspiration, right? I look forward to your projects in our Challenge.


 In my projects i used:

Enamel dots Rose Quartz


Feather
Messy Lines

Tuesday, November 8, 2016

Fun with Inking + Single stamp

Hello all,

Ria on this side. Today I have brought cards made with some inking techniques which I found much interesting to play with.

Technique 1 : Bleaching the Ink
 I  will try my best to describe the process step by step :
  • Take a card stock, cut it into a shape as per your choice, I did with a slanting line.
  • Blend distress inks. To create a depth, blend a darker color on the edges.
  • Let the CS dry naturally in open air or heat it with your tool *I did on a gas stove* 
  • Stamp an image with the darker distress ink that you use for creating depth, and emboss it with clear embossing powder. Here, I have used Lotus delight stamp.
  • Take a pinch of bleaching powder in a bowl full of water and run the water with a brush on to the images only.
  • Wait for sometime, the bleach will react and will fade the area. It can even make the image completely white.
  • Finish it off with some glitter and sentiments. Here I have taken help of glitter cones and alpha banner stamp set.
      Tips:
  1. Select darker colors for the cardstock so that the bleaching technique will give a contrasting image.
  2. Select smaller images that has an outline only.
  3. Be careful with the bleach.
  4. Do not let the paper soak too much of bleach water as it will eventually make it super white that I guess you would not want to.
This is another color on which I have tried the same design.


Technique 2 : Ink Lifting

  • Blend some dark and bright colors on to a card panel.
  • Stamp some solid designs, I have used the same image set but the solid one here.
  • Emboss it with clear embossing powder.
  • Spray water on the CS and wipe it off. This will give a light image on the left out area.
  • Finish it off with some embellishments and ribbons as it is needed.
Supplies used:


I hope you have liked the projects. For any query, feel free to ask.

Till then, with lots of love
Ria


Thursday, September 15, 2016

Sketch inspirations by Nadiya Bilovodenko

Hi PABD fans! Today me Nadiya Bilovodenko is here on the fabulous Peek-a-boo Designs  blog with my inspirations for Challenge 10 - Sketch. I'm madly in love with the sketch. I love the freedom that they give! I love it that everyone goes their own unique project.

My first envelope for monetary gifts - since still warm outside here in Ukraine , I can take pictures of my project outdoor.


I'm in love with a September release. These baby bird from "The Little Sparrow " set has stolen my heart .I have painted them with watercolor pencils.


Wonderful little birds. Some close-ups.


My second envelope for monetary gifts.
At first I made a heat embossed white powder. Then using distress ink to make the background.


Stunning stamp The Little Sparrow It gives freedom of thought and creative flight. Awesome job done by Vinita Jain.


Some close-up.


My third third project.

 I think I hear the singing of the birds.
  
Some close-up. Background is made using a stencil Grid.


Partially stamped and then fussy cut to make the bluebell flower look more dense . All elements are painted with watercolor pencils.


 I have also used the stamp from the same set inside.


I invite you to take part in the sketch Challenge.


In my projects I have used:


Enamel dots


Saturday, June 18, 2016

Leave a sparkle !

Hello Friends ,
Sharada Dilip here today, 
I am sharing   a step by step tutorial on a mixed media creation using stamps and stencils !


1. I started with a gessoed chipboard canvas and 3 shades of distress paint


2. I played around and coloured the canvas 


3. Spayed water and let the colors blend 


4. This was the result after drying !


 5. further stamped images and colored them 


6. using texture paste and stencils I played and created textures till I had the desired results 


Finally added the sentiment to give it a finish !


I totally loved the results and this is soo inspiring to do more !


Supplies Used here 


Hope you enjoyed the tutorial as much as I did creating it !

 looking forward for your crafty take on our challenge this month.

You can find all the details here.

Good Day !!