Showing posts with label shaker card. Show all posts

Wednesday, November 30, 2016

2 cards with Distressed background - Swapna

Hi.. Friends..
Its been a long time i posted here. I have 2 cards for you today. I wanted to make a shaker card from past few days. So i have one shaker card.

Card #1

* The panel I used for both cards is same.
* I gold heat embossed the floral bloom image on a white CS and applied distress inks.
* I die cut the panel with stitched scallop rectangle  dies (used both on same panel).
* Glued frames together and used doubled foam tape to create my shaker well.
* Heat embossed sentiment from Birdie stamp set.
* Used different coloured sequins and secured the frame on card base.

Here is the card


Closer look at sentiment and sparkling sequins


Card #2

This was very easy to put together as most elements were ready.

* I used remainders of frame for this card.
* I glued both pieces on an acetate.
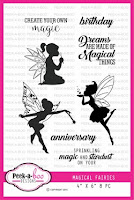
* Heat embossed image and sentiment from magical fairies on vellum.
* Glued the vellum on the panel and the whole panel was mounted on card base with foam tape.

** Only reason to use acetate was to avoid cutting thin strips of foam tape.

Here is my card


Here is the closer look at the panel and sentiment.


Supplies


 Hope you liked them..

See you soon..

Suggestions are always appreciated..


Saturday, October 22, 2016

Cards using October release

Hello Friends Pooja here with second batch of inspirations for this month. I have gone soft and subtle with first card.The background is created using beaded Stencil and layered stitched bubble die-cut over it.


 The butterflies are from Doodled Butterfly set and so is the sentiment.


For my next card I used the negative of fern flourish die (By now you must have known I love using negative of die-cuts more than the positives).


 Its a clear shaker card. I have stitched two acetate sheets together with some sequins sandwiched between them. You can see some the sequins inside the ferns in this picture


Third and the final card for October is simplest.Created the texture by applying texture paste through abstract triangles stencil.


I wanted all the focus to be on fern die-cut so kept the design very clean.The sentiment is from Stringy text set.


I hope you enjoyed the post and loved my cards .

PABD Products used are  :

Saturday, August 20, 2016

Its time for the Plaids!!!

Hey all,

Its Ria again! It has a long time I have crafted anything in particular. Missed me? I missed you people much :)

I have been in love with the Plaids stamp from the beginning and one day I got ample time to play with the designs and had made a lot of plaid designs in every possible color that I could think at that time!

So, why not play with the plaids today? 

Without wasting much time, lets get started :)

Today I am bringing four very easy to do designs with plaids.

First Card

Apart from the Plaids stamp design I am focusing on the Solid shapes for this card.

First of all, stamp the hearts and the diamonds with your favourite colors, here I have used distress inks and highlighted them with felt pens.


 Fussy cut them. Arrange them and stick them in a circular form to make flowers.
I have used a plaid made with black archival ink. I adhered the plaid design on a pale yellow cardstock and coupled it with some rhinestones and enamel dots.


Too much possibilities with these stamps!!! I bet you second me.

Second Card

For the second card I have used a combination of plaids and the Monstrous Stamp for a Birthday card.
This card is very simple to make. I had preserved a plaid design on Pink which I have used for this card. I stamped and colored some images from Monstrous stamp. I made this a Shaker Card. The sentiment is from Happy Birthday to You set.


Isn't it too cute!! ^_^

Third Card

The third is a super time saver! I have used a plaid design I had done with the distress inks and I love the look it has resulted into. Just the plaid with the skeleton leaves, Jute twine and the sentiment! And its done.


The sentiment is arranged from the Banner Alpha.


Fourth Project

The last card of the day from my side is a simple one arranged with a patterned paper, a hand lettered fussy cut sentiment and an arranged sentiment from Banner Alpha. AND Its done!


Aren't these too simple?

Card making tip: The card making becomes super easy and time saving if you have plaids earlier. I had made plaid designs earlier on different colors and these four cards took hardly an hour to complete. 
So, whenever you are free, play with the plaids ^_^

Supplies used:


Thanks for having patience with my long posts everytime :) 
Waiting to see your designs with these wonderful plaids.

With much love 
Ria

Wednesday, August 3, 2016

Celebrate Rakhi with Peek-A-Boo Designs

Hi all,

This time Ria on this side with a set of projects on Rakhi.

 Rakshabandhan or simply Rakhi is a Hindu festival celebrated in many parts of India, which celebrates the love and duty between brothers and sisters. On Rakhi, sisters tie a rakhi or the sacred thread on her brother's wrist which symbolizes the love and prayer by a sister for her brother. 

As the month of August hits, we can see many colorful rakhis being sold in the local markets.
Every year I make rakhis for my brothers; so, this time I thought to make a few with the PABD stamps.

Without wasting time, lets get started:
I will try to give detailed steps as much as possible.

Step 1: I took the Mandala stamp set and had drawn the outline of one of the layers on an OHP sheet.
Step 2: Then I took Happy Birthday to you stamp and stamped the 'BEST' from there on the OHP sheet and handwritten the word Brother, and embossed it white.


Step 3 : I made a shaker RAKHI by sticking it to another paper, a lil bigger on the edges, and some sequins inside it.
Step 4: I finished it with glitter on the edges and a ribbon I had in my stash.


I made another SHAKER rakhi on Blue and have used Banner Alpha for the Word 'BROTHER'.


Now to match it up with, I made a card followed by the simple steps:

Step 1: I have stamped the middle of the Golden Cardstock with Swirly Time and the outer section with Quilted Love by masking one another with two different shades of Gold embossing powders.
Step 2: I have made some handmade flowers (though this is my second try without any die cuts and accessories), placed those with some sequins.
Step 3: A hand written sentiment and some glitters on the edges.

Its done and I am happy to see how the two background stamps can be effectively used.

Lets have a final look on the set.


Supplies used:


I hope you all have liked the shaker rakhis with a matching card. Wish you all a Happy Rakshabandhan :)

With love 
Ria

Wednesday, July 6, 2016

Easel Shaker Card

Hello! crafty friends
I am Daksha Popat and I am very excited as this is my first post as DT for Peek-A-Boo designs. This month's challenge theme is : LAYERED PROJECTS!!!
     Before showing you my project for this month's challenge , I want you to check our this month's challenge  and its Rules ,and keep in mind that for this special challenge we have an additional Rule:Using STAMP,STENCIL OR DIE is a must.


You can see amazing creations from our DT'S HERE..


Now with no further delay my take on for this month's challenge..


This is a pretty easel card and has a shaker center. This Magical Fairies set is adorable. And the sentiments with the set help you create cute and adorable birthday and anniversary cards. 

- I used the newly launched Oval Dual Stitched dies which are Proudly Made in India to make the base of my card.
-  Distressed the base of my card to give it a little magical colour. I avoided used a plain black CS to create this affect.
- I stamped the fairies from the Magical Faries stamp set on Iris Paper and then coloured their wings and sprinkles Rock Candy Glitter. 
- Created one more distressed background for the inner portion of the shaker card.
-Stamped a sentiment from the same set.
- Added foam tape around the base created using the oval dual stitched dies 
- Added sequin and adhered a piece of clear film.
- assembled the entire card and tada the card was ready.

Supplies Used :


My second take on for this month challenge:
I have made 3 tags 


In this first tag I took iris paper n distress it with DI using scattered straw ,shabby shutter,peeled paint,n chipped shappire
after drying with heat gun I misted with water to get fine water effect on my paper again dried then misted with perfect pearl to get fine pearl mist look...finally decorated using #PABD stamps,dies,mulberry flowers, pearl stickers,etc...did matting with black card stock.


In this 2nd tag I have used DI..tattered rose n worn lipstick half n half...then using Arrow stencil I have used fired bricks,used vintage photo n black shoot on the edges to give vintage look...then my tag was looking little dull so to brighten up a little I have used scattered straw in the middle..decorated using Bold butterflies stamp set..n did matting with black card stock,finally highlighted one butterfly with fussy cutting the image


In this 3rd tag first I have used Bubble stencil n distress the paper using worn lipstic n peocock feather...then through the stencil on bubble part I have used dotty line mini stamp set ...DI fired brick lightly..then after removing the stencil I dried the paper and again distress with scatterd straw n tumbled glass...edges distressed with distress tool finally decorated using # PABD stamps ,rhinstones n did matting with black card stock...


Supplies used:


And guess what .. We have a discount codefor you .. Hop on to our store
   and avail 10% discount on- Peek-a-boo Designs store for this month..valid till 31st July 2016.
Discount coupon code - DAKSHA_10

     Looking forward for your crafty take on our this month's challenge...

Love n Hugs
Daksha