Showing posts with label Birthday Card. Show all posts

Saturday, January 13, 2018

Set of Cards with Ruchi's Crafeteria!

Hey there!!
This is Ruchi from Ruchi's Crafeteria..! 
I'm back again and today sharing an article about a Set of Greeting Cards which I've made using my designed stamp 'Floral Zen' and my designed stencil 'Damask' from Peek-a-boo Designs. So much excited!! :)
Here are my cards...


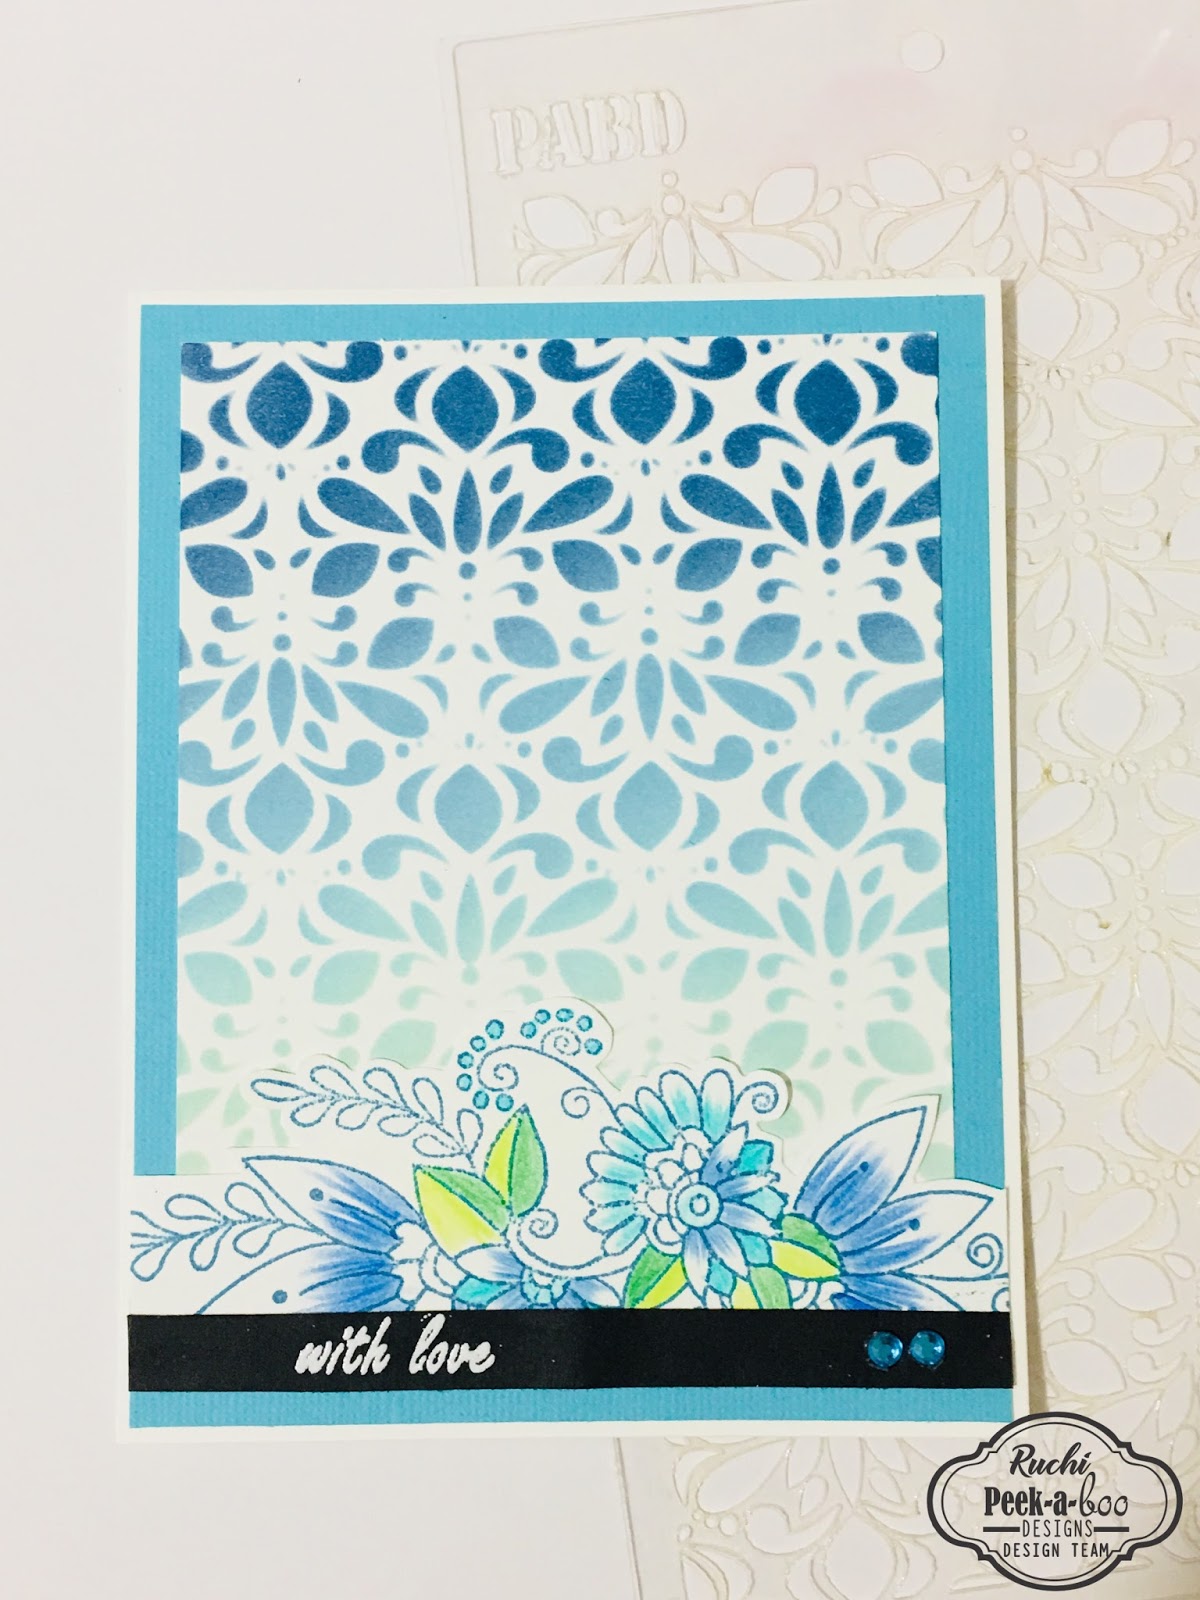
First I've used PABD- Damask Stencil on white cardstock along with various colors of inks for creating my background. Adhered them on their matching color cardstock and put all of them aside. 
After creating my background panels...I've switched to my designed PABD- Floral Zen Stamp set and stamped this flowery image to white cardstock with the matching shades of inks...which can go well with my BG panels. 


Colored a bit all the stamped images using my FaberCastell Pencils. Then I've fussy cut them and adhered on my stenciled background. 
For sentiments..I've used PABD- Pretty Roses and PABD- Floral Cages Stamp sets. I've used black CS for that and heat embossed them in white. cut them in a strips and adhered them on my BGs. 
I've glued all the five BG panels on my card base and added some rhinestones for giving my cards finishing touch. 

Here are individual pics of my cards..


Hope you like my crafty project today and don't forget to participate in our current challenge 'Anything Goes'


Supplies used...


You can shop all the products HERE 

Thanks for stopping by! :)
Happy Crafting!

Ruchi..

Sunday, November 13, 2016

Birthday Cards with me Swapna

Hi..
Friends.. Hope you all are back from Festival mode.
I am sure you are playing along with our November Challenge which is colour inspiration. If not then you can any time. Please read guidelines before linking your project. Today I am with two simple birthday cards. Hope you like them.

Card 1

* I selected distress inks which matches our November challenge theme and applied on white panel.
* Then I stamped one of the butterfly from Doodled butterfly set and clear heat embossed them.
* Then applied darker distress ink on it.
* Trimmed the panel and glued on yellow card base.
* I glued two scallop circles for interest and foam mounted sentiment strip.


Card 2

* Its a very simple card. I heat embossed one of the fairy from Magical fairies.
* Used zig markers to colour wings.
* I embossed the edges of card base with spellbinder dies.
* Foam mounted the fairy on top flap of card base.
* Heat embossed sentiment inside.


Supplies


 Thank you for stopping by..
 

Saturday, August 20, 2016

Its time for the Plaids!!!

Hey all,

Its Ria again! It has a long time I have crafted anything in particular. Missed me? I missed you people much :)

I have been in love with the Plaids stamp from the beginning and one day I got ample time to play with the designs and had made a lot of plaid designs in every possible color that I could think at that time!

So, why not play with the plaids today? 

Without wasting much time, lets get started :)

Today I am bringing four very easy to do designs with plaids.

First Card

Apart from the Plaids stamp design I am focusing on the Solid shapes for this card.

First of all, stamp the hearts and the diamonds with your favourite colors, here I have used distress inks and highlighted them with felt pens.


 Fussy cut them. Arrange them and stick them in a circular form to make flowers.
I have used a plaid made with black archival ink. I adhered the plaid design on a pale yellow cardstock and coupled it with some rhinestones and enamel dots.


Too much possibilities with these stamps!!! I bet you second me.

Second Card

For the second card I have used a combination of plaids and the Monstrous Stamp for a Birthday card.
This card is very simple to make. I had preserved a plaid design on Pink which I have used for this card. I stamped and colored some images from Monstrous stamp. I made this a Shaker Card. The sentiment is from Happy Birthday to You set.


Isn't it too cute!! ^_^

Third Card

The third is a super time saver! I have used a plaid design I had done with the distress inks and I love the look it has resulted into. Just the plaid with the skeleton leaves, Jute twine and the sentiment! And its done.


The sentiment is arranged from the Banner Alpha.


Fourth Project

The last card of the day from my side is a simple one arranged with a patterned paper, a hand lettered fussy cut sentiment and an arranged sentiment from Banner Alpha. AND Its done!


Aren't these too simple?

Card making tip: The card making becomes super easy and time saving if you have plaids earlier. I had made plaid designs earlier on different colors and these four cards took hardly an hour to complete. 
So, whenever you are free, play with the plaids ^_^

Supplies used:


Thanks for having patience with my long posts everytime :) 
Waiting to see your designs with these wonderful plaids.

With much love 
Ria

Saturday, July 30, 2016

The inspiration of Layers challenge #8 from Nadiya Bilovodenko

Hi crafty friends! Today its me Nadiya Bilovodenko at the Peek-a-boo Designs blog with my inspiration for challenge #8 - Layers. The Challenge carries an incredible inspiration from the fellow DTs. 

My first project is card. Today I show you some cards. Have used scrapbooking paper card + some 
incredible stamps from Peek-a-boo Designs. 

I like working with two or three sets of stamps.


 Birthday wishes, what can be better?


My second project - is again a card.


All the words of greeting Is stamped on vellum.

And my main elements I made on scrapbooking paper. Doesnt the polka dotted humming bird look cute ?? 

My third project is a card which has a pocket for money.


Hummingbird adds a charm and glamor to the project. 

Indeedа fun birthday!


 Inside there is a pocket for money or a gift card. 


 I also made a small tutorial. Where I show how I made congratulatory inscriptions and main elements of my projects.


 I invite you to our  Challenge Layers.


In my projects I have used:

Thursday, July 14, 2016

Let's Chill and have some fun!

Hello everyone! It’s Juhi, I’m here with my first post for Peek-a-boo designs. I had so much fun playing with the awesome July release. I combined them with some previous releases to create my projects. Now without further ado, over to my cards:


Project 1:
CAS card with Peek-a-boo designs stamps. Images colored with copic markers.
I created a CAS floral birthday card. I’ve used the gorgeous “Humming Blossom” set from the July release. I love floral stamps and this one’s is absolutely gorgeous! The flower branch offers so many possibilities and added to it are the 2 hummingbirds and a beautiful sentiment!
I stamped and heat embossed the images and colored them with Copic markers. Finally die cut and mounted the panel with double sided foam tape.
CAS card with Peek-a-boo designs stamps. Images colored with copic markers.


Project 2:
Fairy double slider card with Peek-a-boo designs stamps
Slider cards are my latest obsession, I just can’t seem to get enough of them. For my second project I’ve made a double slider card. What is a double slider card? You might ask, well a double slider card has 2 sliding elements :)
Fairy double slider card with Peek-a-boo designs stamps
The fairies, which are also from the July release slide around the center oval sentiment. Isn’t it fun! I think the Magical Fairies stamp set it just perfect for making slider cards.
Fairy double slider card with Peek-a-boo designs stamps

Project 3:
Watercolor card with ice-cream candies with peek-a-boo designs stamps
I used an older stamp set for my 3rd and final project. Water coloring is one of my favorite techniques, I created this card by repeatedly stamping the ice-cream image on watercolor paper and loosely watercoloring the images. I was not concerned about going outside the lines, coloring outside the lines creates a beautiful, dreamy look.
Watercolor card with ice-cream candies with peek-a-boo designs stamps

I hope you like my creations, I had a great time making these.What’s more you can get a discount of 10% on all the items. This discount is valid till 31st of July, 2016.


All you have to do is to apply the Discount Coupon code- JUHI_10


Supplies Used: