Showing posts with label Juhi. Show all posts

Wednesday, November 9, 2016

1 Design colored 3 ways

Hello everyone! Juhi here, today I am sharing 3 cards with the same design but colored with different mediums. It's amazing to see how you can get completely different looks just by changing the coloring mediums.

For my first project I stamped the gorgeous humming bird and flower images with Memento Tuxedo black ink (copic marker friendly ink) on Neenah Solar White 330gsm cardstock (copic maker friendly paper) and colored the images with Copic Markers. I am still learning how to blend copic colors, I tried to add a couple of patches of purple. I need to practice more to get it right!
Peek-a-boo designs humming bird colored with copic markers

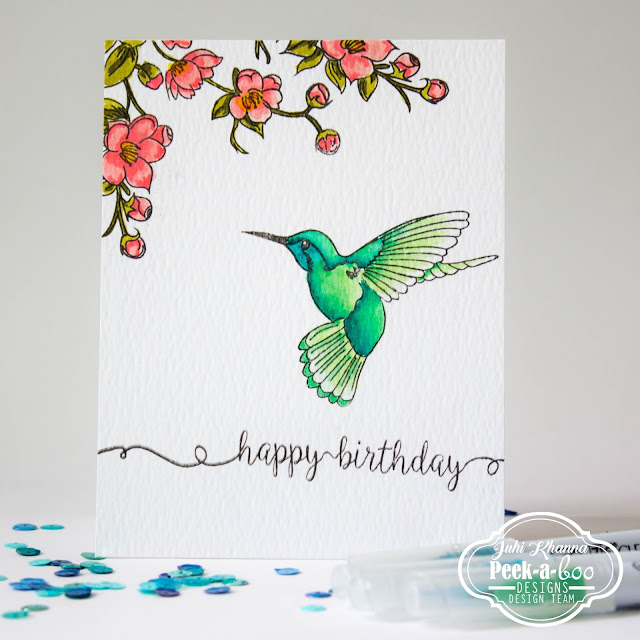
My second card features the same design, this time stamped on Ranger Watercolor Cardstock and colored with Zig Real Brush Water Color Markers.
Peek-a-boo Designs Humming Bird colored with zig real brush markers

For my third and final card, I stamped the design in white ink on Kraft Cardstock and added a few highlights with a white Derwent Inktense Watercolor pencil.
Peek-a-boo designs Humming Bird stamped in white on Kraft Cardstock


I hope you like my projects! Why don't you try to use different coloring mediums to color the same stamp? Remember to use the stamping surface in accordance with the coloring medium!
Thank you so much for stopping by today!

Supplies Used:

Monday, October 24, 2016

Lots of gold and some glitter - October Release Inspiration

Hello everyone! It's Juhi with my second post for October. My first card is a birthday card for my daughter who is turning 5 in December.
Watercolor card with Pee-a-boo stamps and Dies by Juhi
To created the watercolor background, I cut out the number dies on masking paper and stuck them randomly on watercolor paper, leaving some space in the middle for the number '5'.
I then painted the background in pink and orange Gansai Tambi watercolors.
I peeled off the digits once the watercolor dried, some paint did seep under the digits giving the background a beautiful watercolor wash effect! I finally cut out the '5' in gold and stuck it along with some gold thread and sequins and also heat embossed the sentiment in gold.
I hope my daughter likes the card :)

I followed exactly the same process to make the watercolor background of this Thank you card.
watercolor thank you card with Peek-a-boo designs stamps and dies
Don't you just love the gold against the turquoise? I just love how this one turned out!

I used my favorite "Border Frenzy" die from the month's release. I just can't get enough of this die.....love how it lets you add interest without extra bulk, perfect for CAS cards.
I created the background by stamping the broad stripes from the "It's Plaid Time" set in white followed by red inks. I then added the fancy stitches with the "Border Frenzy" die.
For the glitter heart I used the "Shaker Love" Die.
Well that's it from me for now, I hope you find inspiration in my projects! Thank you so much for stopping by today.

Supplies Used:


Chess Pieces


Friday, October 14, 2016

October Inspiration with Juhi

Hello everyone! It's Juhi, with 3 projects featuring products from the October release. October is also the month of Peek-a-Boo Design's first birthday and we have a super fun challenge lined up to celebrate, you can check out the details here.
For the first card, I used the gorgeous Floral Bloom stamp set to create a watercolor card. The set features a bunch of pretty flowers perfect for watercoloring. I colored the image with Gansai Tambi water colors, using only pink and a bit of green.
Peek-a-boo designs Watercolor card
I created the bold striped background by stamping the broadest stripe from the "It's Plaid Time" stamp set in pink.
My second card is a quick Thank you card, I love how it turned out. I stamped "Thank you" in 4 shades of Teal and Blue to create a gradient.
I stamped the background in the same way as my first card. I made the second "thank you" from the bottom as the focal one by stamping "so much" below it and also stamping the outline in black. The outline stamp is also part of the stamp set. Finally, added some enamel dots to finish the card.
For my third and final card I used my favorite die from this release, the Border Fenzy Die. The die does not cut it just creates a perforated border. There are 4 stitch patterns in the set, they are perfect for adding interest to your designs without adding bulk or layers.
I created a square pattern to mimic a chess board with the Border Frenzy Die. I then added squares of white cardstock to create the checkered pattern. Finally I stamped the Knight and the sentiment from the Chess Pieces Set in white and heat embossed it.

Supplies Used:


Floral Bloom

Chess Pieces


Thank you

Tuesday, September 20, 2016

Video Tutorial - Mirror Image Stamping

Hello everyone, its Juhi with a video tutorial. Haven't you ever wished that a stamp faced the other way, the image could be cute animal, a flower bunch, a bird....like in this card I wanted to have 2 foxes facing each other.
mirror image stamping
The "Mirror Image" stamp from the September release lets you do just that.
In today's video I'll be showing you how to stamp mirror images using the "Mirror Image" stamp. It's a slightly long video as I wanted to show the process a couple of times so that you understand it clearly. If you'll bear with me till the end of the video I also show ways to cover up stamping goof ups. So grab a cup of coffee and sit back and enjoy!

Supplies Used:


Cute Critters

Wednesday, September 7, 2016

September Challenge Inspiration

Hello everyone! It's Juhi with my first post for September. I'm super excited to be playing with the awesome September release. You can check out the release here and here.
For today's post I made a few cards for September's Challenge theme. The theme this month is a sketch.


Project 1:
Inlaid Die cut background with Peek-a-boo designs dies
For my first project I created a fall themed card. For the background panel I started with a watercolor paper which I masked partially and watercolored with shades of brown and green. I then stuck this watercolor paper onto a piece of thick card stock and die cut the leaves, since the card stock backing was very thick the die did not cut through and created an inlaid die-cut effect.

Project 2:
CAS card using Peek-a-boo design Floral Fantasy stamps
Project 2 is a CAS card using the gorgeous Floral Fantasy Stamp set. I've colored the image with Copic Markers.

Project 3:
My 3rd card is a Diwali card. I've used the adorable Renne Diwali mini stamp set. The cute image was an absolute delight to color! The background has been created with the "Beaded" stencil.

Project 4:
My 4th and final project is a watercolor card using the cute "Little Sparrow" set. This image was super fun to watercolor. I stamped and fussy cut the sparrow to add a little dimension to my card. I finally cut the watercolor panel with the "Scallop Rectangle" die to give it a framed look. This die is a must buy, you'll be seeing me use it a lot in future projects!
I hope my cards inspire you to create some projects of your own. Don't forget to link them up to the challenge blogpost!
Supplies Used:


 Enamel Dots


Renne Diwali