Friday, April 22, 2016

A Sneak Peek!

As I write this post, I can't tell you how psyched I am to be able to bring these projects for your eyes only!

Woah... I forgot the intros et al... Hello! ^__^

I'm Halak and I know I know... it's peek-a-tute Friday but so much fun to hijack the blog and do something different!

Don't worry, the peek-a-tute will happen later towards the evening but for now, CHECK THIS OUT!

A couple of ATCs that I made using.... oh yeah.. never before seen Peek-a-boo Designs EXCLUSIVE stamps!

Of couse I couldn't show you the entire set... the design team would murder me for such shenanigans, but Vidushi allowed me to share 3 images from the exclusive stamp set that you'd get if you register for the Exclusive Stamp Club membership.

Read all about Stamp Club : Here

For membership, click :  Here

The moment I received these stamps I was like, man oh man, I wanna make something using these... can I can I... oh pretty please...

So Vidushi said, okay, but only 3 images.

How cute is that postal stamp image?! Probably the first one that says India too!

And that adorable hot air balloon!

Okay, I better shush and let you check out the projects. In the ATC on the left, the balloon is paper-pieced, whereas the vibrant one on the right is colored using Sakura pens.

You will see me today once again for the tutorial but till then, have an awesome day!

P.S. I highly recommend signing up for the Exclusive Stamp Club.
This stamp set is bloody AWESOME!!!

Thank you for stopping by and keep smiling! *Hugs*


Posted via Blogaway

Wednesday, April 20, 2016

Guest Designer | Hussena

Hello everyone!
This is Hussena here and I'm so happy to be guest designing for Peek-a-boo designs this month. I was sent two amazing stamp sets by Vidushi to work with and I had a really great time creating projects using them. The stamps are good quality and are a dream to work with!

So without further ado, let me show you the projects :)

First up is a card I made with the Flowers in a Jar set. To create this card I first stamped and heat embossed all the images on a watercolor paper using Versafine Onyx Black ink and clear embossed them. Then I watercolored my images using Distress inks, once dry, I fussy cut them and foam mounted them on my card base and created a diagonal design in the bottom half using washi tapes to add interest. The sentiment is from the same set and was stamped and heat embossed directly on the card base using Ranger's Super Fine Gold embossing powder.


To make my second card, I first created my background using Texture Paste mixed with Peacock Feathers Distress ink using a Heidi Swapp stencil. Then I die cut a circle using Spellbinders Nestabilities Circle dies and sponged it using Distress inks and foam mounted it on my card base. Then I stamped the flowers, leaves and the buds from the Flowers in a Jar set heat embossed it using Super Fine Gold embossing powder from Ranger and directly colored my images using a sponge dauber and Distress inks and fussy cut them before placing them on my card base. Added a few sequins to finish my card.


To create my third card, I again stamped and heat embossed the flowers and foliage from the Flowers in a Jar stamp set and colored it using Distress inks. This time I fussy cut the flowers separately and foam mounted them against the trellis background which I have made using various dies. The background is dry embossed using an embossing folder and lightly painted using Distress ink Peacock Feathers.


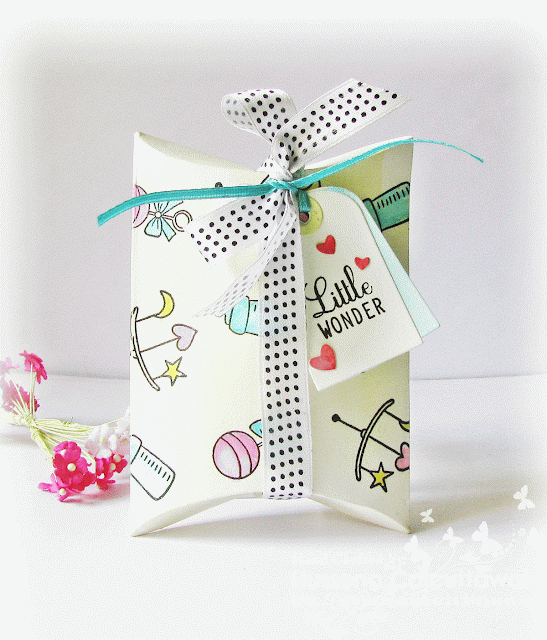
Next up are some really cute projects I created using the Little Wonder stamp set. This stamp has some of the cutest images which work very well for creating some adorable embellishments too :) I decided to create my own pattern paper using the small images from this set, so I directly stamped and clear embossed three of the images from this set and lightly colored in using Distress inks again! Once my pattern paper was ready, I made a pillow box out of it. Tied a bow using satin ribbon and added a tag to it which is again stamped from the Little Wonder set.


This cute gift tag is also created using the Little Wonder stamp set. Both the image and the sentiment are from the same set. I have off-setted the tag using another tag on the back with a strip of Washi Tape.


I created two Onesies, one is a card and other a tag. The central image is stamped and colored using different mediums. On the card, I have colored it using watercolor pencils and on the tag I have used markers to color my image.

Onesie Card

Onesie Tag


Hope you all like my projects. I had so much fun creating with these sets. Do let me know your views regarding it. Would love to hear from you. :)

Thank you once again, Vidushi for this opportunity to Guest Design for Peek-a-boo.

Monday, April 18, 2016

Little Wonder!

Hello Everyone!

Finally I am back here to share some of my projects that I made using my all time favorite theme.

Before I start, with months I see some beautiful projects coming up and so I am hoping you all are playing along our monthly challenge which is Challenge #5

Its a very interesting challenge and also forces you to go beyond your imagination. So here we go with my take on the challenge.

I have made 3 projects using the Little Wonder Stamp set which is a absolute complete stamp set when one has to make any baby theme projects/cards/invites/favor/etc.


Project 1: Invites


Its a pocket invites with the invite details on one side and one side having the layout for a baby shower/birthday or any occasion.


The coloring that you see are using distress inks and some with pencil colors. The pocket is embossed and using some laces have embellished it. Again its a boy theme hence kept it blue and green.

Project 2:

My second project is heavy embellished baby card. I have kept it a general theme and hence can be used for a boy or a girl.


All the pieces are made 3D with raised embellishments from the stamp set.

Project 3:

The third project is a simple gift bag which will compliment any of the above project either on gifting or any favors.


The Doily that you see here is a paper doily that you get locally in any cake shop. I have used 3 - 4 to make it thicker and then used distress ink to color it. 

The sentiment is from the same set with a added star :).

Hope you like and this shall inspire you and give you some ideas to play along our challenge this months.

The " little Wonder " set used in all these projects is a very apt set for any projects used. You can have a look at all the other stamp set that we have in this month here.

Thanks for stopping by and do let me know how you like it.
Lots of love !


Saturday, April 16, 2016

Guest designer-Kavitha

Hello everyone,
 its kavitha here today and i am very happy to be guest designing for Peek-a-boo stamps.I would like to thank Vidushi for this opportunity .I was really thrilled to receive the made in india stamps,

For my first two cards i used Lily hope stamps,i always love floral stamps and this one is really awesome.Perfect for people who loves coloring and the sentiments in this set is really good.
The stamping quality is really good and give sharp impression.I tried it with few inks-archival,memento n versamark and it worked perfectly fine.Don't you love the lilies,i just want to make them in every color combination:).I colored the flowers with zig markers on water color paper n fussy cut them,the sentiment in this card is from the same stamp set.
Stamp used for the cards:

I used Brush stroke mini stamp for this card, stamped them in rainbow colors using memento inks and used layered die cutting technique
Stamped used for this card:

A tag using mixed media stamp-Messy lines,the background is done with gelatos,then randomly stamped on the background,sentiment  and butterflies to complete the tag.

Finally a mixed media layout,i randomly stamped messy lines stamp in the background. These mixed media stamps give amazing texture n depth to your  projects and adds lot of character to them.
Stamp used on tag n layout: 


So thats it from me,hope you enjoyed the projects!!
Happy crafting,
kavi

Friday, April 15, 2016

Mixed Media Art Journal for Mother’s Day: Design Idea @Peek-a-tute

Hello friends ,
Sharada Dilip here today , Im sharing my latest creations with this months releases at 
Peek-a-boo Designs (PABD)

Mixed Media Art Journal for Mother’s Day: Design Idea
A page dedicated to Mom!


Creating a mixed media page is all about layering textures and colors. This time I reached for my watercolors crayons .


                                     ColorPeps Smoothy Maped 12 Gel Crayons I have been using from a year now 


I have scribbled randomly all over the page and started blending in the colors using water.


Further to add textures I have layered my scrap papers on which I had done stamp trials.


I have added papers on which I have water washed stamped images , 
ie after using the stamps for crisped images , sprayed water on the stamp and stamped again to get this effect 


Finally placed everything and modge podged the whole page 


I have stenciled using texture paste at various random places 
I have used Mother's Day Stamp from PABD as the Highlight of my creation

Monday, April 11, 2016

Cute Critters

Hello and good evening! ^__^

I'm Halak and today I'm going to be talking about the super cute Exclusive stamp set that is called : Cute Critters.

This is what the set looks like :

To read about the stamp club click : Here 

It's a great opportunity to own some exclusive stamps that will not be released to the general public!

The following Peek-a-boo Designs Products are used in the projects :

1. Cute Critters stamp set (Exclusive)
To subscribe click - Here

2. Lily Hope stamp set (sentiment is used in Project #3)
To buy click - Here

3. Wine Cardstock
To buy click - Here

Oh and incase you were wondering, this is what the Lily Hope set looks like :


So, without further ado let's check out what I made :

Card #1 - Mr. Fox

Mr. Fox here was paired up with some pretty butterflies, and given a mix washi tape base to stand on.

If you do not like water coloring and building forest scenes, this look is perfect for your project.

I colored Mr. Fox with color pencils.

That gorgeous card base is the fantastic wine cardstock by Peek-a-boo designs. Look at that stunning texture on it!

If you haven't gotten some already... well then, what are you waiting for, go get some!

What? You love watercoloring? It's the latest trend you say?

Have no fear, project #2 is here!

Card #2 - Panda (minus the kungfu!)

I masked the panda and stamped the thin bamboo stamp around to build background.

I colored it with distress inks and added highlights with color pencils.

Oh, and the bamboo leaves were hand-drawn. ^__^

This critter set has fantastic images for building watercolored background too!

It even has an awesome tree which led me to creating project #3.

Card #3 - The Happy Tree

So this is where I used that sentiment from Lily Hope set.

Paper-pieced the trunks and the central tree leaf portion.

Colored in the other two trees using a Sakura pen.

Of course I had to add a couple of butterflies, they just add to that happy tree who likes flaunting it's sparkly coat of leaves and who is comfortable in his skin.. or should I say bark... lol! :D

This happy tree project is the classic clean and simple cardmaker style.

So, fun party with modern elements, some watercolor bliss or the classic clean and simple... which is your style?

I'd love to hear from you! Thank you so much for stopping by and have a wonderful sparkly evening!

*Big Panda Hugs*


Posted via Blogaway