Showing posts with label Bold Hugs n Love Stamp. Show all posts

Friday, May 27, 2016

Peek-A-Tute Friday : Black Magic Technique !!

Hi Friends...how you all are doing ?? Its Vijaylaxmi Siyal and sharing a very fun technique with two variations !!

So today's tutorial is based on Black Magic Technique !!

This summer is already very hot & killing us with the high temperature ..so i have one cool card too for you guys at the end of the post..but before that see my Black Magic .. ;p ..LOL.. Just kidding ;p

So now come back to the tutorial...here it is step - by - step --

1) Black Magic Technique With Emboss Resist & Black Ink -


Steps -

1) I used the following supplies for this technique -
- PABD Black Card Stock 
- PABD Swirly Lines BG Stamp
- PABD Bold Hugs 'n' Love Stamp Set
- PABD Acrylic Block 4*6"
- 3-4 Distress Inks
- Clear Embossing Powder
- Versa-Fine Watermark Ink
- Heat Gun
- Violet CS for the base.

For this card i took a white cs of 4*4 " ...Distressed it with 3-4 colors of DI ...!!


2) Then i Took PADB Swirly Line BG Stamp & Using PABD Acryilic Block, Stamp it on the colored panel with Versa-fine Watermark Ink.


 3) Sprinkle Clear Embossing Powder & then Heat Set it !!


4) Now comes the fun part -- I took my Momento Dye Ink Pad & Rub that directly on the CS until it covered all the panel fully black ..!!


5) Then Using wet baby wipes i swipe off the Ink from the cs and there the magic happens..:) All the embossed area does not absorb the black ink and they came out clear and hence the color under them :)
Look how pretty the whole Background :)


5) I tried the same Technique with Versafine Onyx Black Ink & After wiping off the ink with baby wipe this was the result !! And i am not impressed with this one so chuck it..!! Versafine doesn't work for me :)


- Stamps Used For the above Card - 


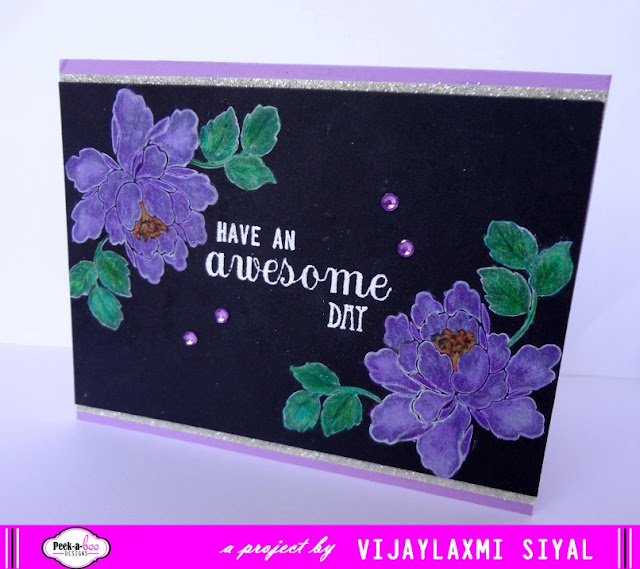
2) Black Magic Technique With White Pigment Ink & Pencil colors -


Steps -
1) I used the following supplies for this technique -
- PABD Black Card Stock 
- PABD Peonies Love Stamp set
- PABD Acrylic Block 2*3"
- Pencil Colors 
- Colorbox white Pigment ink
- White CS for the base.


2) Stamped the solid peony with white Pigment ink on Black CS from PABD Peonies Love Stamp.


 3) This is how it looks after stamping the all elements. 


4) Start coloring using pencil colors only when your white Ink  dries completely...i didn't wait for its complete dry so did a mess ;p But no worries you can use black pencil color to cover all silly mistakes ..magicccc ;p


 5) Heat embossed the sentiment From PABD Awesomeness Stamp in white in center ...!! Taddaa..we are done ...mat it on the card stock with Silver glitter stripes on both sides & some blings for extra touch !! 


I hope you enjoyed this Tutorial & Do try any of these technique but don't forget to share with us !!
Stamps Used to create this card -


So Here comes the cool & yummy card for you guys as a treat ..;) ( From me to you all as a token of thanks for your love & support )..!!


Stamp used to create this - 


Please Don't forget to take part in our ongoing monthly challenge - here !! Few Days more left so hurry up gals :)


Friday, April 29, 2016

Peek-a- Tute : Baby Boy Themed Pop up Box !!

Hii...This is Vijaylaxmi & Welcome again to the second tutorial post of the day !! I hope you all have seen our DT Piyanki's Post where she described how wonderfully one can use all Tiny Elements from stamps to create the beautiful cards & backgrounds !!

I am super excited as i am sharing my very first Video Tutorial on how to make a Pop-up-Box :)

( Please bear my tiny mini mistakes in the video ;p )

This is what i made for my tut post -- A Baby Boy Themed Pop-up-Box !!


Check out the Video --


Stamp Set & CS Used from Peek-a-boo Designs are - 


1) Little Wonder                                           2) Holi Hai ( For Balloons )
               

3) Black Card Stock - 12*12


So..Did you enjoyed the video ..I hope you liked it !! Then don't forget to hit the like button & also to subscribe our channel for more such videos & Tutorials !!


Hey..wait Guys...that's not all for today ...!! As this is the last post of this month so i decided to showcase some more cards ..so sit back & keep reading this post till the end ;p


Here is my first card --


Steps On Making this - 

1) Took a White CS n then using Dotty Lines Mini Stamp created a white heat embossed background.
2) Distress the BG with Candid Apple & Abandon Coral DI using heat emboss resist technique.
3) Stamped the cute Panda From Our Exclusive Cute Critter Set on Neenah white CS. then Colored it using water-coloring pencils & fussy cut it !!
4) Put it on a wood grain circular panel which is layered with a Vellum Scalloped Circle.
5) Stamped the Sentiment from Bold Love 'N' Hugs Stamp set ..loved the way we can club so many different words to create one perfect sentiment from this stamp set.
6) finally added a twine through a punched hole and place it on the embossed bg panel using 3D foam tape for more interest !!
7) Yay..its done..simple !!


Stamp Sets & Vellum Used from Peek-a-boo Designs are - 

1) Cute Critter Set (Exclusive)                            2) Bold Hugs 'N' Love         


3) Dotty Lines Mini Stamp                                       4) Vellum - 12*12


Second Card --


 Steps On Making this - 


1) Took a Water coloring CS n then stamped Roses & Leaves using Flower In A Jar Stamp.
2) Colored all the Flowers & leaves using water-coloring pencils & fussy cut all !!
3) Put a piece of beautiful PP at some diagonal overlaying the golden paper strip on a Neenah white Card Stock.
4) Stamped the Sentiment from the same Flower in A Jar Stamp set ..& added some Black stones here n there for final touch-up..!!
5) Loved the way it turn out..simply  beautiful :)


Stamp Set & CS Used from Peek-a-boo Designs are - 

1) Flower in A Jar                                               2) Golden Card Stock 12*12


                                      Third & Last Card --( My Most Favorite too ;p)


Steps On Making this - 


1) Took a vellum First of all n then Golden heat embossed all Roses & Leaves using Flower In A Jar Stamp.

2) Colored all the Flowers & leaves using Nirmal water-colors & fussy cut all !!

3) Took a Mint CS and stamped the Stripes from Its Plaid Time Stamp Set in same mint color pigment ink using Tone-on-Tone Stamping Technique !!

4) Heat embossed the sentiment in gold from The Lily Hope Stamp set on vellum banner !!


5) Then Splatter some Golden & Blacks inks for extra texture and look :) 


6) Cut a frame from Golden Card Stock ..placed it in center then arranged the vellum flowers & leaves around it & then the sentiment banner !!
7) Then added some Black & Golden Sequins also here n there for final touch-up..!!
8) I just loved this card ...not looking like made by me ..lol...but this one is my favorite from all above cards ;p


Stamp Set & CS Used from Peek-a-boo Designs are - 


1) Flower in A Jar                               2) Its Plaid Time                          3) Lily Hope


 4) Vellum - 12*12                                                         5) Golden Card Stock 12*12 


All Three Cards ---


Phewww....the post comes to the happy ending ..i hope you guys enjoyed everything i shared today !! 

PS Reminder -- Our Current Challenge # 5 has still time to participate So link up your beautiful creations fast & pls don't forget to read the Challenge Guidelines as we really feel bad to disqualify any of your lovely creations just because of not following the rules.

Happy crafting everyone...Hugs ..

Vijaylaxmi ( Shalu)

Monday, February 29, 2016

Plaid background tutorial with cardmaking tips

Hello hello! ^__^

I'm Halak and today I'm going to be showing you a tutorial on how to create a plaid background through my first project and the second project will consist of some cardmaking tips featuring one of my favorite sets : All Occasions - Hindi.

This is Project #1

Here are the steps :

First, I took 4 designs out of the It's Plaid Time set and mounted them onto my acrylic block.

Stamped the first two designs in pink dye ink and the latter two in red.

After that, I repeated the process and that gave me 8 horizontal lines that you can see here :

As I did in my first step, the second time also I did the first two designs in pink and the next two in red.

Once this was done, I repeated the same thing vertically and ended up with this beautiful plaid design :

So pretty! ^__^ 4 designs, stamped 4 times... twice horizontally and twice vertically gave me this pattern.

I did a small portion in plaid because  I was going to use only a part of it in my project but you can stamp a larger piece of cardstock to make a bigger background.

One this was done, I hand-tore the piece, adhered half of it to red  cardstock and after that adhered the whole piece to white cardstock.

Stamped sentiment from the Bold Hugs 'N' Love stamp set, punched out a few butterflies in red and adhered them along with some pearls + sequins.

So that's how it was done. I absolutely love this plaid set because it makes some really fun backgrounds.

Now, let's move on to the second project :

Here it is, using the All Occasions - Hindi stamp set onto... textured cardstock!

Yeah, I stamped the beautiful sentiment in archival on textured cardstock. It gave me a super pretty textured look that I love!

Check out this close up :

Here's what I did :

Onto textured cardstock, I stenciled a design and stamped my sentiment.

After that, added some mulberry flowers and gave them a pearl center.

Finished it off with some sequins and matted it onto kraft cardstock.

Here are some cardmaking tips :

1. Less is more. If you want texture and do not want to over-embellish, opt for a textured cardstock.

2. Ink you stamp well and test it on a scrap piece of paper first. Once you are certain that the stamp is conditioned and will stamp well, ink it and stamp firmly on textured cardstock.

3. Do not move your hands or wriggle the acrylic block while lifting it because that will lead to a blurred impression.

4. Lastly, while making a plaid design, don't worry too much about precision et al. I used a large acrylic block without grid lines to make my pattern and had a whole lotta fun in the process!

So, I hope you enjoyed reading this and it inspired you to make something new! Till next time dear friends! *Hugs*


Posted via Blogaway