Showing posts with label Peek-a-Boo Designs Acrylic Blocks India. Show all posts

Tuesday, September 6, 2016

Sparkle & Shine.!!

Hi Friends...Its Vijaylaxmi here !! Today I am sharing three very simple cards so let's start -


 Card - 1


Steps -

1) Took a card stock (neenah classic ) ...Distressed it with three different DI to create ombre BG !!
2) Then using Peek-a-boo Indian Motif stamp set ..I heat embossed one of the Paisley in gold on the whole panel ..and filled the rest space with small stamps from the same set !! 
3) Then Cut the whole panel with Peek-a-boo Rectangular stitched die !!
4) Cut the word Celebrate in gold using September released Celebrate Word Die from Peek-a-boo Designs. Also added a heat embossed sentiment from Peek-a-boo Happy Deepawali Stamp set below this word to complete the greeting !!
5) Arranged  everything on a black card stock as a base and its finish !!
6) I just love this stamp set as it is so opt for our Indian festivals !!

Card -2 


Steps -

1) For this card I simply sponged the white card stock using some Distress inks & Peek-a-boo's September released Stencil .
2) Then used the Peek-a-boo's latest stitched  fishtale die to cut the vellum banner and Peek-a-boo scalloped  circle die with stitches to die cut the golden scalloped border !! 
3) Heat embossed the sentiment in gold from previously released  Positive vibes Stamp set !! 
4) Placed everything together and the card is done !! Easy right !! ;)

Card - 3 


Steps - 

1) This card is completely made with previously released products ...;)
2) Took a white card stock ..stamped the circular images from Peek-a-boo's Circular fonts Stamp Set in different shades of Pigment inks !!
3) Die cut the whole Panel with Peek-a-boo Stitched Rectangular Die and also die cut the little star & heart from Peek-a-boo' s die !!
4) Placed all in right manner and layered a pattern paper for some interest on a pink top folding card and then placed the white stamped card panel over it !! Tadda ..we are done !! I just love the simplicity of this card !!

That's all for today ..meet you all soon with some more creations!! 
Thanks for stopping by and don't forget to check this month's challenge !!

Hugs.. 
Vijaylaxmi Siyal .

Sunday, July 17, 2016

3 CAS Cards !!

Hi Crafty Bugs...Vijaylaxmi here ...!! Hope you all are enjoying this monsoon... :) 
I am sharing few cards today using some stamps from old release & some stamps & dies from latest release !! 

So without any delay here are what i made ---


First Card

Steps -

1) Took a standard sized CS and using Jennifer McGuire's Floating Die cut Panel Technique cut the panel using Graceful Lattice Die.
2) Then Stamped the flowers from Mandala Stamp set & colored them using Pencil colors.Fuzzy cut all n arranged on the lattice bg !!
3) Stamped the sentiment from Magical Fairies stamp set, matted with a silver glitter strip.
4) Done :)

Supplies used -


Second Card 
As per the season's demand i created this card :p Yup ...who does not love this rainy season and awesome cloudy weather so inspired by the surroundings i made this one..!! :) 


Steps -

1) Took a standard sized CS.
2) Then Stamped all the elements from Splitter Splatter Stamp set & colored them using Pencil colors.
3) Stamped the sentiment from the same stamp set on a die cut & distressed green panel.
4) Fuzzy cut all images & arranged to create the monsoon scene & yay we are done :)

Supplies Used -


Third Card 

As Teachers Day is also coming in next months so i thought i should start making cards from now to gift all to my Daughters Teachers as i am very slow so i started early .. :p


Steps -

1) Took a standard sized CS in grey color.
2) Then Stamped the monochromatic background using all alpha's from Scripty Alpha's Stamp set & Back to school Stamp set in grey ink.
3) Stamped the Trophy & Sentiment from the same stamp set on a die cut  panel using Dual Stitched Rounded Rectangular Die.
4) colored the image & tied a twine to create more interest  :)

Supplies Used -


All Stamps, Dies, Stencils , Acrylic Blocks & Card stocks are now added to the store so hop on to the store's new website for better shopping experience !!
Enjoy this monsoon with the ongoing discount cum sale ....for discount coupon code please use .....VIJAYLAXMI_10
Hope you are joining us at our July Challenge #8 : Layers !! Do read the rules & guidelines before submitting your lovely entry :)                         Thank you so much for taking time & leaving me love :)                                                          ***   Vijaylaxmi Siyal  ***


Friday, May 27, 2016

Peek-A-Tute Friday : Black Magic Technique !!

Hi Friends...how you all are doing ?? Its Vijaylaxmi Siyal and sharing a very fun technique with two variations !!

So today's tutorial is based on Black Magic Technique !!

This summer is already very hot & killing us with the high temperature ..so i have one cool card too for you guys at the end of the post..but before that see my Black Magic .. ;p ..LOL.. Just kidding ;p

So now come back to the tutorial...here it is step - by - step --

1) Black Magic Technique With Emboss Resist & Black Ink -


Steps -

1) I used the following supplies for this technique -
- PABD Black Card Stock 
- PABD Swirly Lines BG Stamp
- PABD Bold Hugs 'n' Love Stamp Set
- PABD Acrylic Block 4*6"
- 3-4 Distress Inks
- Clear Embossing Powder
- Versa-Fine Watermark Ink
- Heat Gun
- Violet CS for the base.

For this card i took a white cs of 4*4 " ...Distressed it with 3-4 colors of DI ...!!


2) Then i Took PADB Swirly Line BG Stamp & Using PABD Acryilic Block, Stamp it on the colored panel with Versa-fine Watermark Ink.


 3) Sprinkle Clear Embossing Powder & then Heat Set it !!


4) Now comes the fun part -- I took my Momento Dye Ink Pad & Rub that directly on the CS until it covered all the panel fully black ..!!


5) Then Using wet baby wipes i swipe off the Ink from the cs and there the magic happens..:) All the embossed area does not absorb the black ink and they came out clear and hence the color under them :)
Look how pretty the whole Background :)


5) I tried the same Technique with Versafine Onyx Black Ink & After wiping off the ink with baby wipe this was the result !! And i am not impressed with this one so chuck it..!! Versafine doesn't work for me :)


- Stamps Used For the above Card - 


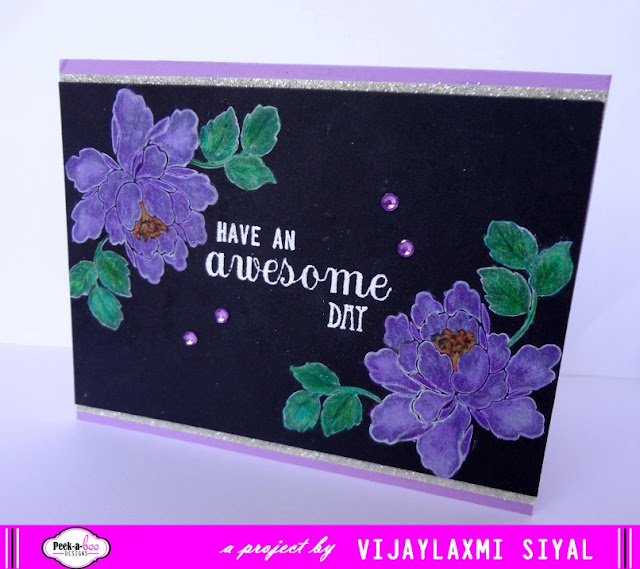
2) Black Magic Technique With White Pigment Ink & Pencil colors -


Steps -
1) I used the following supplies for this technique -
- PABD Black Card Stock 
- PABD Peonies Love Stamp set
- PABD Acrylic Block 2*3"
- Pencil Colors 
- Colorbox white Pigment ink
- White CS for the base.


2) Stamped the solid peony with white Pigment ink on Black CS from PABD Peonies Love Stamp.


 3) This is how it looks after stamping the all elements. 


4) Start coloring using pencil colors only when your white Ink  dries completely...i didn't wait for its complete dry so did a mess ;p But no worries you can use black pencil color to cover all silly mistakes ..magicccc ;p


 5) Heat embossed the sentiment From PABD Awesomeness Stamp in white in center ...!! Taddaa..we are done ...mat it on the card stock with Silver glitter stripes on both sides & some blings for extra touch !! 


I hope you enjoyed this Tutorial & Do try any of these technique but don't forget to share with us !!
Stamps Used to create this card -


So Here comes the cool & yummy card for you guys as a treat ..;) ( From me to you all as a token of thanks for your love & support )..!!


Stamp used to create this - 


Please Don't forget to take part in our ongoing monthly challenge - here !! Few Days more left so hurry up gals :)