Showing posts with label inspire word die. Show all posts

Tuesday, September 6, 2016

Sparkle & Shine.!!

Hi Friends...Its Vijaylaxmi here !! Today I am sharing three very simple cards so let's start -


 Card - 1


Steps -

1) Took a card stock (neenah classic ) ...Distressed it with three different DI to create ombre BG !!
2) Then using Peek-a-boo Indian Motif stamp set ..I heat embossed one of the Paisley in gold on the whole panel ..and filled the rest space with small stamps from the same set !! 
3) Then Cut the whole panel with Peek-a-boo Rectangular stitched die !!
4) Cut the word Celebrate in gold using September released Celebrate Word Die from Peek-a-boo Designs. Also added a heat embossed sentiment from Peek-a-boo Happy Deepawali Stamp set below this word to complete the greeting !!
5) Arranged  everything on a black card stock as a base and its finish !!
6) I just love this stamp set as it is so opt for our Indian festivals !!

Card -2 


Steps -

1) For this card I simply sponged the white card stock using some Distress inks & Peek-a-boo's September released Stencil .
2) Then used the Peek-a-boo's latest stitched  fishtale die to cut the vellum banner and Peek-a-boo scalloped  circle die with stitches to die cut the golden scalloped border !! 
3) Heat embossed the sentiment in gold from previously released  Positive vibes Stamp set !! 
4) Placed everything together and the card is done !! Easy right !! ;)

Card - 3 


Steps - 

1) This card is completely made with previously released products ...;)
2) Took a white card stock ..stamped the circular images from Peek-a-boo's Circular fonts Stamp Set in different shades of Pigment inks !!
3) Die cut the whole Panel with Peek-a-boo Stitched Rectangular Die and also die cut the little star & heart from Peek-a-boo' s die !!
4) Placed all in right manner and layered a pattern paper for some interest on a pink top folding card and then placed the white stamped card panel over it !! Tadda ..we are done !! I just love the simplicity of this card !!

That's all for today ..meet you all soon with some more creations!! 
Thanks for stopping by and don't forget to check this month's challenge !!

Hugs.. 
Vijaylaxmi Siyal .

Monday, August 29, 2016

2 Cards and a Tag

Hello everyone, it's Juhi. Today I'm sharing 2 cards and a tag I made for August's challenge Challenge #9 Color Inspiration. In case you haven't already, there is still time to play. This month's challenge is a color inspiration. You can find all the details and enter here.
Aren't those colors just yummy :), well now onto my projects....
Project 1:
Negative Die Cutting with Peek-a-boo Designs Dies
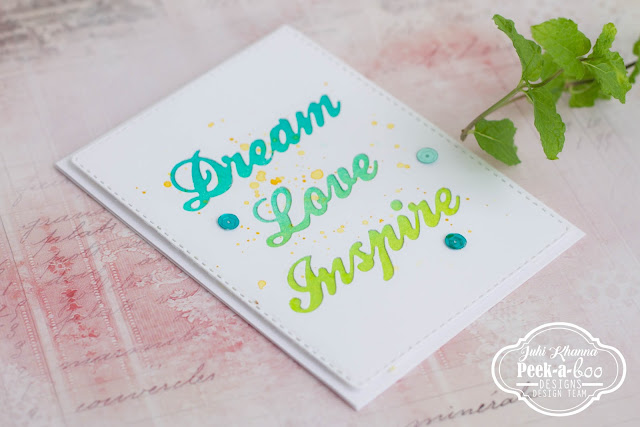
Negative diecutting is the focus of this card. This is my first attempt at negative diecutting and I love the results. I die cut the words "Inspire", "Love" and "Dream" on a piece of white cardstock and retained the negative of the die. Backed it with a piece of ink blended watercolor paper. I also added some splatters of paint and sequins to finish the card.
Negative Die Cutting with Peek-a-boo Designs Dies

Project 2:
Humming Blossom from Peek-a-boo designs
I've used the left over die-cut from my previous tutorial post on this card. You can check out how I used the negative pieces of the Graceful Lattice die-cut in this post.
The humming bird and flowers are stamped on watercolor paper and colored with watercolor markers and then fussy cut.
It's not visible in the photo but I added some clear shimmer on the humming bird.
Humming Blossom from Peek-a-boo designs

Project 3:

My 3rd project is a tag. I created an ink blended background using the colors from the color inspiration.
And then stamped the Fairy silhouettes and added some chunky glitter.
I hope you liked my projects and are inspired to created something for the August Challenge!
Thanks for visiting and have a great week!

Supplies Used:


Sunday, July 31, 2016

LOVE, INSPIRE AND CREATE!

Hello everyone! Martha Lucia here to share with you three fun card ideas that I made using our stamps and die cuts. Here is my first card:


To create this I used the watercolor faux technique. I inked an acrylic block with Pool Party classic ink and then I sprayed with water before placing the block over the whisper white layer of paper. When the paper was totally dry I pasted over it three Word Love in different colors and positions. I completed the message using parts of two images from the stamp set Friends Forever, stamped with Versafine Onix over the same color of the card base. As final touch I added a few rhinestones over the watercolor background. 


For my second card I used the stamp set It's Plaid Time. I stamped each line alternating three different colors of ink and cross the lines on the center. Then I cut the center using the small oval from the Dual Stitched Oval Die Cut Set, to create the inlaid technique. 


Also I cut the same oval in fun foam to get more dimension and I pasted the decorated oval over the foam. I pasted the decorated layer over the card base and pasted the oval exactly in the same place. To finalize the decoration I cut the Word Inspire in Pink Pirouette and Pool Party card stock to paste over the oval with a little movement. 


For my third card I chose neutral colors and vellum card stock. The base is crumb cake and the second layer is early espresso. I stamped two flowers from the stamp set Peonies Love over vellum using VersaMark and White Embossing Powder. I melted the powder with the heat tool and colored the flowers on the back using pearlescent.


I cut the second layer of the card using early espresso card stock and one of the die cuts from the Dual Stitched Rounded Rectangle. I stamped a sentiment over this using VersaMark and White Embossing Powder. Then I pasted some loops of pink thread, the vellum flowers and some sequins. As final touch I colored the front of the flowers with Clear Wink of Stella.


Products Used:


I hope my projects inspire you to use the new stamps and now I have a special news for you! You can buy all the new releases with a 10% off using my 
discount code MARTHA_10 . So run and don't let the stamps and dies run out of the store! Today is the last day of this promotion!!!

See you soon!!!


Friday, July 22, 2016

Peek-A-Tute Friday with Ria

Hello Everyone,

This is Ria again on this side with some projects on your favorite Friday! I hope you all are enjoying the July release and I am already seeing fabulous projects by everyone.

Are you taking part in this month's challenge Challenge 8 - Onlylayers


I am here today with three new projects going with the month's challenge theme. Let us move onto the projects:

FIRST PROJECT:

My first project is an altered glass bottle. I have made the project in four easy steps:


Step 1: Using your distress inks, stamp the butterflies from Bold butterflies of every size on a paper (I have used scrap paper and I never throw scraps and better use for these tiny stampings). I have also cut some tiny butterflies using a paper punch.

Step 2: Fussy cut the butterflies, blend the same ink on it by which it was stamped and I have used some bling with Wink of Stella.

Step 3: Cover the body of the bottle with acrylic colors with a sponge. Let it air dry for few minutes.
Step 4: Apply the texture paste on it through Leafy Delight Stencil. Let it dry. And then cover partially the same acrylic colors on it.

I have finished it by sticking the butterflies on it- on an ascending order. Placed all the three word diecuts from July release and some sequins.


SECOND PROJECT:


I have come to know about the transparent cards last month and wanted to try this asap. I have made the night scene with Festive berries, Blue Chase & Grape vine from artistry inks; with some mist and white acrylic.
Stamped the fairies, colored the wings, fussy cut them and adhered them to the margins. The sentiment is also from the same set. I have stamped the stars from the solid shapes set and embossed them with Enchanted Gold. Its done!


THIRD PROJECT:


My third project is a card this time. Made the background with the BOX-tacular stencil with some mist and pearl effect on it. Stamped and colored the flourish from the Humming blossom Set. Cut it into an oval shape, adhered on a black foam and then on the background, finished with some enamel dots and sequins!


SUPPLIES USED


I hope I have done justice to the mixed media and the transparent card with my first trials. 

Do not forget to avail these awesome collection that too on a discount by applying the code RIA_10


Thanks for stopping by
Hugs
Ria