Showing posts with label Love word die. Show all posts

Monday, August 29, 2016

2 Cards and a Tag

Hello everyone, it's Juhi. Today I'm sharing 2 cards and a tag I made for August's challenge Challenge #9 Color Inspiration. In case you haven't already, there is still time to play. This month's challenge is a color inspiration. You can find all the details and enter here.
Aren't those colors just yummy :), well now onto my projects....
Project 1:
Negative Die Cutting with Peek-a-boo Designs Dies
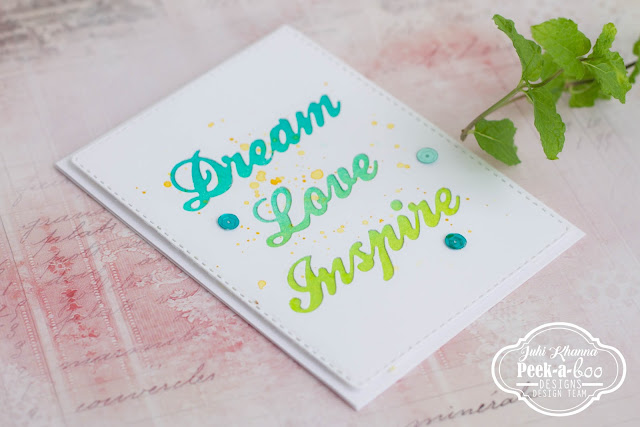
Negative diecutting is the focus of this card. This is my first attempt at negative diecutting and I love the results. I die cut the words "Inspire", "Love" and "Dream" on a piece of white cardstock and retained the negative of the die. Backed it with a piece of ink blended watercolor paper. I also added some splatters of paint and sequins to finish the card.
Negative Die Cutting with Peek-a-boo Designs Dies

Project 2:
Humming Blossom from Peek-a-boo designs
I've used the left over die-cut from my previous tutorial post on this card. You can check out how I used the negative pieces of the Graceful Lattice die-cut in this post.
The humming bird and flowers are stamped on watercolor paper and colored with watercolor markers and then fussy cut.
It's not visible in the photo but I added some clear shimmer on the humming bird.
Humming Blossom from Peek-a-boo designs

Project 3:

My 3rd project is a tag. I created an ink blended background using the colors from the color inspiration.
And then stamped the Fairy silhouettes and added some chunky glitter.
I hope you liked my projects and are inspired to created something for the August Challenge!
Thanks for visiting and have a great week!

Supplies Used:


Sunday, July 31, 2016

LOVE, INSPIRE AND CREATE!

Hello everyone! Martha Lucia here to share with you three fun card ideas that I made using our stamps and die cuts. Here is my first card:


To create this I used the watercolor faux technique. I inked an acrylic block with Pool Party classic ink and then I sprayed with water before placing the block over the whisper white layer of paper. When the paper was totally dry I pasted over it three Word Love in different colors and positions. I completed the message using parts of two images from the stamp set Friends Forever, stamped with Versafine Onix over the same color of the card base. As final touch I added a few rhinestones over the watercolor background. 


For my second card I used the stamp set It's Plaid Time. I stamped each line alternating three different colors of ink and cross the lines on the center. Then I cut the center using the small oval from the Dual Stitched Oval Die Cut Set, to create the inlaid technique. 


Also I cut the same oval in fun foam to get more dimension and I pasted the decorated oval over the foam. I pasted the decorated layer over the card base and pasted the oval exactly in the same place. To finalize the decoration I cut the Word Inspire in Pink Pirouette and Pool Party card stock to paste over the oval with a little movement. 


For my third card I chose neutral colors and vellum card stock. The base is crumb cake and the second layer is early espresso. I stamped two flowers from the stamp set Peonies Love over vellum using VersaMark and White Embossing Powder. I melted the powder with the heat tool and colored the flowers on the back using pearlescent.


I cut the second layer of the card using early espresso card stock and one of the die cuts from the Dual Stitched Rounded Rectangle. I stamped a sentiment over this using VersaMark and White Embossing Powder. Then I pasted some loops of pink thread, the vellum flowers and some sequins. As final touch I colored the front of the flowers with Clear Wink of Stella.


Products Used:


I hope my projects inspire you to use the new stamps and now I have a special news for you! You can buy all the new releases with a 10% off using my 
discount code MARTHA_10 . So run and don't let the stamps and dies run out of the store! Today is the last day of this promotion!!!

See you soon!!!


Friday, July 22, 2016

Peek-A-Tute Friday with Ria

Hello Everyone,

This is Ria again on this side with some projects on your favorite Friday! I hope you all are enjoying the July release and I am already seeing fabulous projects by everyone.

Are you taking part in this month's challenge Challenge 8 - Onlylayers


I am here today with three new projects going with the month's challenge theme. Let us move onto the projects:

FIRST PROJECT:

My first project is an altered glass bottle. I have made the project in four easy steps:


Step 1: Using your distress inks, stamp the butterflies from Bold butterflies of every size on a paper (I have used scrap paper and I never throw scraps and better use for these tiny stampings). I have also cut some tiny butterflies using a paper punch.

Step 2: Fussy cut the butterflies, blend the same ink on it by which it was stamped and I have used some bling with Wink of Stella.

Step 3: Cover the body of the bottle with acrylic colors with a sponge. Let it air dry for few minutes.
Step 4: Apply the texture paste on it through Leafy Delight Stencil. Let it dry. And then cover partially the same acrylic colors on it.

I have finished it by sticking the butterflies on it- on an ascending order. Placed all the three word diecuts from July release and some sequins.


SECOND PROJECT:


I have come to know about the transparent cards last month and wanted to try this asap. I have made the night scene with Festive berries, Blue Chase & Grape vine from artistry inks; with some mist and white acrylic.
Stamped the fairies, colored the wings, fussy cut them and adhered them to the margins. The sentiment is also from the same set. I have stamped the stars from the solid shapes set and embossed them with Enchanted Gold. Its done!


THIRD PROJECT:


My third project is a card this time. Made the background with the BOX-tacular stencil with some mist and pearl effect on it. Stamped and colored the flourish from the Humming blossom Set. Cut it into an oval shape, adhered on a black foam and then on the background, finished with some enamel dots and sequins!


SUPPLIES USED


I hope I have done justice to the mixed media and the transparent card with my first trials. 

Do not forget to avail these awesome collection that too on a discount by applying the code RIA_10


Thanks for stopping by
Hugs
Ria


Wednesday, July 13, 2016

Love and Dream Mixed Media Cards by Shilpa

Hello Everyone,
Shilpa here 

I am sure, you all are enjoying lovely creations by design team with Peek-a-boo's July release.
It has everything for everyone... stamps, dies, stencils.. find the whole collection here.

and here are my mixed media Cards..


I've used Peek-a-boo designs Dual stitched oval die, Dream Die,Bold Butterflies stamp and Blocks and Blocks stencil for this card.


To start with, I die cut 2 different layers of design papers with Dual stitch Oval die.
next.. created the texture with stencil and modelling paste in the background and used watercolors in between grooves.
Peek-a-boo dies are of good quality... they cut through papers easily..,
I love this font for word " Dream"


Beautiful butterfly is a stamped image from Bold Butterflies stamp set.


and here is my next grungy card...


I've used Dual stitched Rounded Rectangle die, "Love" word die, Layered Dahlia stamp set and  Box-tacular stencil


here are close up views..


Hope you enjoyed my creations today...
I'll see you again next week...

Don't forget to avail 10% discount at Peek-a-boo store 
using Coupon Code SHILPA_10

Thanks so much for stopping by.


Products used from Peek-a-boo designs
Dual Stitched Oval Die,
 Dream word die,
 bold butterflies stamp set,
 Blocks and Blocks stencil,
 Love word die,
 layered dahlias stamp,
 Boxtacular stencil
Dual Stitched Rounded Rectangular Die