Monday, August 22, 2016

CARD INSPIRATION IN DIFFERENT STYLES

Hello crafty friends, Martha Lucia here to share with you a few card inspirations in different styles using different techniques and elements. The first card that I want to show you uses our Challenge theme. If you don't remember what it is, you can refresh your memory HERE. Take a look at my card:

CARD INSPIRATION IN DIFFERENT STYLES

Creating this was very easy and quick:
1. Cut the card base using Melon Mambo card stock. The size is 4-1/4"x11" with score in 5-1/2". Round the corners with corner punch.
2. Using one of the Dual Stitched Rounded Rectangles, cut the second layer using a decorated or designer paper. Paste this layer directly over the card base.
3. Using the small oval from the Dual Stitched Oval Collection cut an oval using Very Vanilla card stock.
4. Stamp over the oval the sentiment included on the stamp set Humming Blossom using Versafine Onix.
5. Paste the oval over the decorated base using dimensionals or zapdots.
6. Sponge a separate piece of Very Vanilla card stock using three or four different colors of the distress ink. In my model I used three colors: Mustard Seed, Spiced Marmalade and Mermaid Lagoon.
7. Stamp the image of the big bird included on the stamp set Humming Blossom using Versafine Onix and then heat emboss it with clear embossing powder. 
8. Fussy cut the bird image with scissors and paste partially over the oval and the decorated base.

CARD INSPIRATION IN DIFFERENT STYLES

My second card is very different from the first. In this second model I used three different stamp sets. Take a look at my card:

CARD INSPIRATION IN DIFFERENT STYLES

This was very easy to make too, and if you have any tool like a Misti or Stamping Press, the process will be quick.
1. Cut the base of the card using Whisper White card stock. The size is 4-1/4"x11" with score in 5-1/2".
2. Using one of the images from the stamp set It's Plaid Time stamp two or three lines at the upper and lower part of the card base. You can use any color of ink. In my sample I used Basic Gray.
3. Rotate your card 90 degrees and use the same color of ink, stamp the same image across the whole surface keeping the same distance between the images.
4. Cut a layer of card stock of 4-1/4"x3-3/4" using a color of card stock that coordinates with  your design.
5. Cut a third layer of card stock whisper white of 4-1/4"x3-1/2" and stamp the dual flower image from the stamp set Flower in a Jar and the sentiment from the stamp set Friends Forever using Memento Tuxedo Black Ink over this piece.
6. Color the flowers using markers and paste the layers over the card base.
7. Finalize the decoration by tying a double loop of color trimming.

CARD INSPIRATION IN DIFFERENT STYLES

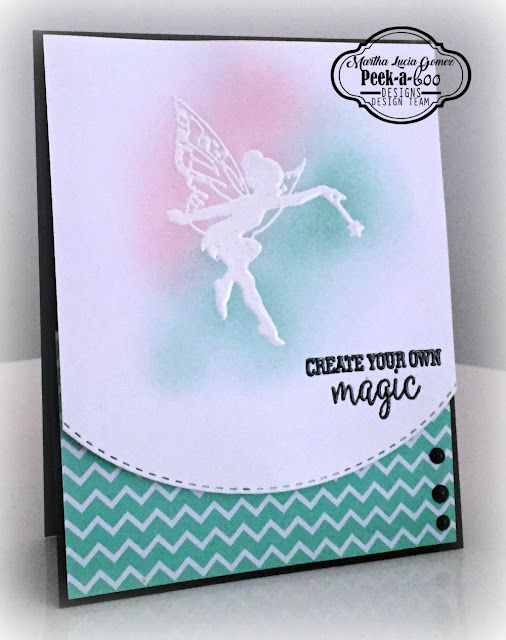
The third card is a Clean and Simple model. In this one, I used the stamp set Magical Fairies and the Dual Stitched Oval Dies. Take a look at my card:

CARD INSPIRATION IN DIFFERENT STYLES

The base of this card is Basic Black card stock and I combined it with Whisper White card stock and a piece of decorated paper.

1. Cut the base card. The size is 4-1/4"x11" with score in 5-1/2"
2. Cut the second layer out of decorated paper. The size is 4-1/8"x2-3/4" and paste it directly over the card base.
3. Cut a third layer in whisper white card stock. The size is 4-1/8"x5-3/8".
4. Put the white layer partially inside of the one of the Dual Stitched Oval Dies to create the lower border. Leave enough space to stamp your images and pass it through the big shot.
5. Stamp one of the fairies included on the stamp set Magical Fairies using Versamark and then heat emboss it with white embossing powder. 
6. Sponge around the fairy using two different colors of ink. In my sample I used Brushing Bride and Pool Party.
7. Stamp one of the messages included on the same stamp set using Versafine Onix and then heat emboss it with clear embossing powder.
8. Finalize the decoration by adding some dots with Black Crystal Dots on the lower part.

CARD INSPIRATION IN DIFFERENT STYLES

I hope my projects inspired you. These are three different styles of cards using stamping techniques like emboss resist, double stamping and blending with distress ink. In addition, you can see how to use the die cuts in a normal way and alter the original designs. You only need to let your imagination fly and fall in love with your stamps to create what you love.

These are the products that I used for your inspiration:


See you soon!

Sunday, August 21, 2016

Soar -Journal spread by Shilpa

Hello Everyone,
Shilpa here,

I am back with mixed media journal spread!


I've used Peek-a-boo Designs Victorian Gate die, Bold Butterflies stamp set, Boxtacular stencil here.


I used Boxtacular stencil and modelling paste to create texture in the background. 
Further I spritzed lindy's stamp gang inks in pinks and browns.
Victorian gate is a die cut from new Dies collection from Peek-a-boo, which is colored with watercolors.


I adhered stamped butterfly image on the background first and then created texture with stencil and colors.

I've used beautiful sentiment from the same stamp set to finish off the journal spread.

Thanks so much for stopping by


Products used from Peek-a-boo Designs


Saturday, August 20, 2016

Its time for the Plaids!!!

Hey all,

Its Ria again! It has a long time I have crafted anything in particular. Missed me? I missed you people much :)

I have been in love with the Plaids stamp from the beginning and one day I got ample time to play with the designs and had made a lot of plaid designs in every possible color that I could think at that time!

So, why not play with the plaids today? 

Without wasting much time, lets get started :)

Today I am bringing four very easy to do designs with plaids.

First Card

Apart from the Plaids stamp design I am focusing on the Solid shapes for this card.

First of all, stamp the hearts and the diamonds with your favourite colors, here I have used distress inks and highlighted them with felt pens.


 Fussy cut them. Arrange them and stick them in a circular form to make flowers.
I have used a plaid made with black archival ink. I adhered the plaid design on a pale yellow cardstock and coupled it with some rhinestones and enamel dots.


Too much possibilities with these stamps!!! I bet you second me.

Second Card

For the second card I have used a combination of plaids and the Monstrous Stamp for a Birthday card.
This card is very simple to make. I had preserved a plaid design on Pink which I have used for this card. I stamped and colored some images from Monstrous stamp. I made this a Shaker Card. The sentiment is from Happy Birthday to You set.


Isn't it too cute!! ^_^

Third Card

The third is a super time saver! I have used a plaid design I had done with the distress inks and I love the look it has resulted into. Just the plaid with the skeleton leaves, Jute twine and the sentiment! And its done.


The sentiment is arranged from the Banner Alpha.


Fourth Project

The last card of the day from my side is a simple one arranged with a patterned paper, a hand lettered fussy cut sentiment and an arranged sentiment from Banner Alpha. AND Its done!


Aren't these too simple?

Card making tip: The card making becomes super easy and time saving if you have plaids earlier. I had made plaid designs earlier on different colors and these four cards took hardly an hour to complete. 
So, whenever you are free, play with the plaids ^_^

Supplies used:


Thanks for having patience with my long posts everytime :) 
Waiting to see your designs with these wonderful plaids.

With much love 
Ria

Friday, August 19, 2016

Peek-Tute Friday with Juhi: Die-cutting with a twist

Hello everyone! It's Juhi. I am so excited to share my first tutorial for Peek-a-boo Designs. The focus of today's tutorial is die-cutting. I will show a fun and easy way to use the tiny negative die cut pieces of the Graceful Lattice die.
Here's the card I created.
I was inspired by this month's challenge theme, which is a color inspiration, you can find the details here.


To make the card:
I started with a piece of watercolor paper painted in colors of the rainbow. I stuck the watercolor panel onto a piece of same sized cardstock with some repositionable glue and ran it through my die cutting machine with the Graceful Lattice Die. The die only cut through the top watercolor paper layer, leaving the bottom cardstock layer intack. Then I peeled off the die-cut watercolor paper leaving the tiny negative pieces stuck on the cardstock panel. I made a start to finish video of how I made this card.
I hope you enjoyed watching the video! This technique will work with most background dies. I would  love for you to have a go at it!

Supplies used:
Graceful Lattice Die

Double Stitched Rounded Rectangle Die

Dream Word Die
Thanks for visiting!

Thursday, August 18, 2016

Teacher's Day Projects & Ideas

Hello and good morning dear friends!

I'm Halak and today it's a quick post showcasing some projects that I created using the Back To School stamp set by Peek-a-boo Designs (PABD).

It's a very versatile set that can help you create cards and projects not just for teachers but also for students!

How about a card for your art teacher? This set is perfect for it!

And that's not all, you can create tags, fun book-marks, decorative photo frames, graduation projects... really... the list is endless!

Special Offer :

Because Teacher's Day is just around the corner, PABD have a FLAT 10% OFF on this stamp set! (No coupon code needed)
So, instead of Rs. 550/- you can bring home this set for Only Rs. 495/- !!) How awesome is that!

Check it out >>> HERE

List of PABD products used in the projects :

Blocks And Blocks Stencil

Leafy Delight Stencil

That's that folks!

I hope my post inspired you!
Thank you so much for stopping by and have a lovely day!


Posted via Blogaway

Tuesday, August 16, 2016

HIDDEN DIE CUT TUTORIAL

Hello crafty friends, Martha Lucia here to share with you a technique that I love to create with my die cuts. Today I am using the stamp set Peonies Love composed of four beautiful flowers and three sentiments but you can use any stamp set because the most important in this tutorial is the use of the die cut, and the Dual Stitched Rounded Rectangle. Take a look at my card:


Creating this card is a very simple process. Let me tell you how to make this:

1. Cut the base of the card. The size is 4-1/4"x11" with score in 5-1/2". I used Whisper White card stock.

2. Cut a second layer using the same color of the card base. The size is 4-1/4"x5-1/2".

3. Arrange and stamp the images over the card base using Versafine Onix. 


You are noticed that I only stamped three of the flowers included in the stamp set Peonies Love. These flowers are perfect to color inside.

4. Cover your stamped images with Clear Embossing Powder and melt the powder with the heat tool.


5. Continue with the stamping process but this time, take the die cut that you want to hide and put it in place where you want it. Use this as reference and arrange the other stamps to finalize the stamping and embossing steps.


6. Using the Dual Stitched Rounded Rectangle die cut that you selected in the step before, cut the frame in your stamped layer.


7. Cut the same frame over a piece of fun foam.


8. Now is time to paint the flowers. I only paint the flowers that are inside the die cut part. For this I used color pencils. I always apply the light colors before and then the dark colors. Paste the large frame with the embossed flowers directly over the card base.


9. Paste the painted rectangle over the fun foam rectangle and then this piece over the card base. You will get a little dimension with this piece. Complete the decoration by adding some details of Crystal drops under the sentiment.


Here are the products that I used in this project. You can find these in our Peek-a-boo store.

I hope my project inspired you. You can use any stamp set and any die cut with this technique and, if you want, you can change the color of the die cut piece to create a dramatic contrast.

See you soon!!!

Sunday, August 14, 2016

CAS Sunday with Nadiya Bilovodenko

Hi crafty friend! Happy Sunday to everyone!!! Hope you have fun today )))) Ok))) Nadiya Bilovodenko is at the PABD blog today wiht you. I have some CAS cards. They are simly and beautiful.
The first card for today:
 Halftones muted ..... ..... and some mysterious ...
 Miraculous inscriptions were the impetus.
 Heart Jewellery handmade. I made for you a quick tutorial.
The second a project is a card too.
 Oh, and I liked the  bubbles  stencil )))
 And the last a project for today:
 
Truly a true an inscription ...
 Close up...

I propose a quick step by step tutorial.

1. Take a set of stamps. We need hearts.
 2. Gray in ink stamps do the. Add glossy. Sprinkle the glitter. 
3. After drying simply cut the heart.
4. With distress ink and stencil  bubbles make the background.
5. Add the major inscriptions.

Your CAS projects are ready. Enjoy your creativity with PABD!


In my projects I have used:

Bubbles stencil 
Solid Shapes
Positive Vibes
Magical Fairies